
Maintaining your floor bike pump is the simplest way to ensure your tires are always inflated to the correct pressure before a ride. Over time, dust, road grit, and ambient moisture can find their way into the pump’s cylinder, degrading the internal seals and compromising the accuracy of the pressure gauge. By establishing a routine of cleaning the exterior, lubricating the internal O-rings with silicone grease, and storing the unit in a dry, protected space, you can prevent air leaks and extend the lifespan of your equipment.
A well-maintained floor pump delivers smooth, efficient strokes, requiring less physical effort to reach high pressures. Conversely, neglecting basic upkeep often leads to a sticky plunger, inaccurate pressure readings, and air escaping from the pump head during use. Taking a few minutes to service your pump ensures that it remains a reliable tool in your cycling kit, saving you from the frustration of flat tires and damaged valves.
Why Regular Bike Pump Maintenance Matters
Every time you push down on your floor pump’s handle, the piston draws in ambient air. In tropical environments like the Philippines, this air often carries high levels of humidity, fine dust, and salt particles. As these elements enter the pump cylinder, they mix with the existing lubricant to form an abrasive paste. This paste gradually wears down the rubber O-rings and scratches the smooth inner walls of the cylinder, leading to pressure loss.
Products mentioned in this guide
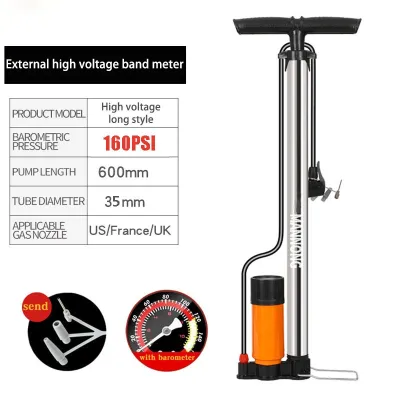
468 Lazada user ratings
What you see is what you get. The product was delivered to me successfully and no damage at all. On time ang pag deliver, the seller is so n…Read full reviewShow less
What you see is what you get. The product was delivered to me successfully and no damage at all. On time ang pag deliver, the seller is so nice, ang laki ng tulong ng voucher na galing sa kanila kaya swak at sulit ang price lalo na ang product. Kudos to everyone and God bless us all. Happy holidays!
🔨Durability: Compact and portable design, Reliable and consistent performance, Versatile pump for bikes and motorcycles, 🔌Compatibility: Pwe…Read full reviewShow less
🔨Durability: Compact and portable design, Reliable and consistent performance, Versatile pump for bikes and motorcycles, 🔌Compatibility: Pwede siya sa lahat bike motorcycle 👜Portability: malaki siya at kasya sa tricycle at car no damage din
Quality:10/10 Appearance:10/10 Performance:10/10 MAGANDA, MATIBAY, LEGITTTT HAHAHAHAHAHA Lakas ng bomba saka ang mura lang pero di cheap tig…Read full reviewShow less
Quality:10/10 Appearance:10/10 Performance:10/10 MAGANDA, MATIBAY, LEGITTTT HAHAHAHAHAHA Lakas ng bomba saka ang mura lang pero di cheap tignan HAHAHAHAHAHAHAHHAH satisfied! 🤩😆
🔨Durability:Reliable and consistent performance, Quick inflation for fast tire filling, 🔌Compatibility:good 👜Portability:very good all coupl…Read full reviewShow less
🔨Durability:Reliable and consistent performance, Quick inflation for fast tire filling, 🔌Compatibility:good 👜Portability:very good all coupling are fit and good condition.
It is well packed and fast delivery. easy to use and handle . made of plastic material gope it Will last .
Prices are valid at publication and may change. Please refer to the product page for the latest price.
Moisture is another silent enemy of your pump’s internal components. If damp air remains trapped inside the metal cylinder or the gauge housing, it can cause corrosion on springs, metal valves, and the delicate mechanism of the pressure dial. A compromised gauge may display incorrect readings, leading you to underinflate or overinflate your tires, which increases the risk of pinch flats on rough roads.
You can easily identify when your floor pump requires immediate attention by observing its performance. If the plunger feels stiff, squeaks during the downstroke, or resists being pushed down, the internal lubrication has likely dried out or become contaminated. Air leaking from the base, hose connections, or the pump head when attached to a tire valve is another clear indicator that the seals are failing and need to be cleaned or replaced.
Tools and Materials You Will Need
Before starting your maintenance routine, gathering the correct supplies will prevent accidental damage to the pump’s delicate seals and threads. You do not need specialized or expensive equipment, but using the wrong cleaning agents or lubricants can permanently ruin the rubber components.

For cleaning, prepare a mild dishwashing soap diluted in warm water, along with a bottle of isopropyl alcohol (70% concentration is ideal). The mild soap solution is perfect for wiping down the exterior body, handle, and base, while the isopropyl alcohol works well for dissolving old, contaminated grease inside the cylinder without damaging the metal or plastic surfaces. Avoid using harsh industrial solvents or degreasers, as these can warp plastic parts and degrade rubber seals.
The choice of lubricant is critical for the longevity of your pump. You must use a high-quality, 100% silicone grease or a dedicated bicycle pump lubricant. Silicone grease is water-resistant, does not wash away easily in humid conditions, and is completely safe for rubber O-rings and plastic plungers. A small tub of silicone grease, which can be purchased for around ₱150 to ₱400 at local hardware stores or online marketplaces, will last for years of routine maintenance.
Step-by-Step Guide to Cleaning the Pump Cylinder and Head
Begin the cleaning process by finding a clean, well-lit workspace where you can lay out small parts without losing them. First, unscrew the top collar or cap of the pump cylinder, which is typically located just beneath the handle. Carefully pull the plunger rod and piston assembly straight out of the cylinder, taking note of the order in which any washers, bumpers, or springs are arranged on the shaft.
Next, detach the hose from the pump base. Many modern floor pumps use a threaded compression nut to secure the hose; use an adjustable wrench or your fingers to loosen this nut, then gently pull the hose away from the base. Once the hose is free, unscrew the collar of the pump head to access the internal rubber grommets and check valves. Lay these small parts out on a clean microfiber cloth in the exact order you removed them to simplify reassembly.
To clean the main cylinder, wrap a clean, dry microfiber cloth around a long wooden dowel or a thin rod, then insert it into the cylinder to sweep out old grease, dust, and debris. If the old grease is stubborn, dampen the cloth with a small amount of isopropyl alcohol and repeat the process until the interior walls are clean and smooth. Wipe down the exterior of the cylinder, the base, and the handle using a damp cloth with mild soapy water, then dry them thoroughly with a clean towel.
Inspect the pressure gauge carefully. If you notice condensation or moisture trapped inside the dial face, it indicates that humid air has penetrated the housing. For gauges with removable covers, gently pry or unscrew the cover to let the moisture evaporate naturally in a dry, well-ventilated room. Wipe the exterior of the gauge face with a dry microfiber cloth.
How to Lubricate the O-Rings and Internal Seals
Once all components are clean and dry, you can proceed to lubricate the internal seals to restore smooth operation and airtight performance. Locate the main piston O-ring, which is the large rubber ring fitted around the plastic or metal plunger head at the end of the rod. Inspect this O-ring closely for any signs of cracking, flattening, or tearing; if you observe physical damage, you will need to source a replacement ring of the same size.
Apply a small, pea-sized amount of 100% silicone grease directly onto your fingertip. Gently work the grease around the entire circumference of the piston O-ring, ensuring a thin, even coating. It is important to avoid over-lubricating the seal; excess grease will migrate down into the bottom of the cylinder, where it can clog the check valves, block the air passage to the gauge, or attract airborne dust that acts like sandpaper over time.
If your pump features secondary seals, such as small O-rings inside the pump head or around the hose connections, apply an extremely thin film of silicone grease to these parts as well. This helps the rubber retain its elasticity and prevents it from drying out and cracking in hot, tropical climates. Avoid getting any grease inside the actual air channel of the hose or the valve ports.
Carefully slide the plunger assembly back into the clean cylinder, taking care not to pinch or twist the main O-ring as it enters the opening. Thread the top cap back onto the cylinder and tighten it securely by hand. Reattach the hose and the pump head components in the correct order. To test your work, pump the handle up and down several times; the stroke should feel smooth, consistent, and completely free of friction or squeaking.
Proper Storage to Prevent Dust and Moisture Buildup
How you store your floor pump between rides plays a significant role in its overall lifespan and performance. Storing the pump incorrectly can put unnecessary stress on the hose, warp the plastic base, or allow moisture to accumulate in sensitive areas.
Always store your floor pump in an upright, vertical position on its base. Avoid laying it flat on the floor, as this makes it easier for dust to settle on the plunger rod and enter the cylinder through the top cap. Secure the hose in its designated clips or wrap it gently around the handle as recommended by the manufacturer. Never bend or kink the hose sharply, as this can weaken the rubber and lead to high-pressure ruptures over time.
In tropical regions with high humidity, such as coastal areas of the Philippines, indoor storage is highly recommended. Avoid leaving your pump in damp garages, outdoor sheds, or utility balconies where it is exposed to extreme temperature fluctuations and moisture. The combination of heat and humidity accelerates the breakdown of rubber seals and can cause the internal metal springs to rust prematurely.
To provide extra protection against airborne debris, consider placing a simple dust cap over the pump head when it is not in use. If your pump did not come with a cap, you can cover the head with a small, clean plastic bag secured with a rubber band. This simple step prevents insects and household dust from nesting inside the valve ports.
Troubleshooting Common Pump Issues After Maintenance
If you assemble your pump and find that it is not functioning correctly, a minor adjustment is usually all that is required to resolve the issue. If the pressure gauge reads zero, sticks, or fluctuates erratically, check to see if any excess silicone grease has migrated into the air passage leading to the gauge. You can often clear this by detaching the gauge or hose and using a dry cotton swab to gently clean the port.
If you hear air escaping or feel a loss of pressure during a stroke, you need to isolate the location of the leak. Mix a few drops of dishwashing soap with water and apply a small amount of the soapy solution to the hose connections, the top cap, and the pump head while the system is under pressure. The appearance of growing bubbles will pinpoint the exact spot where air is escaping, indicating that a thread needs tightening or an O-ring is misaligned.
When troubleshooting, always verify that all threaded connections are snug but avoid overtightening them, which can strip plastic threads or crush rubber washers. If you have cleaned, lubricated, and properly aligned all seals but the pump still fails to hold pressure, the internal components may be worn beyond repair. At this point, stop troubleshooting and contact the manufacturer or visit a local bike shop to acquire official replacement parts.
Frequently Asked Questions (FAQ)
Can I use WD-40 or petroleum jelly to lubricate my bike pump?
No, you should never use WD-40, petroleum jelly, or standard penetrating oils to lubricate your floor bike pump. Petroleum-based products and penetrating solvents chemically react with rubber and plastic, causing O-rings and seals to swell, soften, and eventually disintegrate. Once these seals degrade, the pump will lose its airtight seal and fail to generate pressure. Always stick to 100% silicone grease or lubricants specifically approved by the pump manufacturer to ensure the materials remain intact.
How often should I completely disassemble my floor pump?
For most cyclists, a complete disassembly and internal lubrication are only necessary once a year. However, if you ride frequently in dusty, sandy, or wet conditions, or if you store your pump in a humid outdoor environment, you should perform this deep maintenance every six months. Regular exterior wipe-downs and keeping the pump head covered will minimize the need for frequent teardowns, keeping your pump operating smoothly with minimal intervention.
Community discussion
Share your experience or ask a question. Comments are reviewed before publication.