
To build a highly effective, full-body workout routine using a cable machine, you do not need a wall covered in dozens of specialized accessories. A carefully selected set of five core attachments—a lat pulldown bar, a tricep rope, a close-grip V-bar, a pair of single D-handles, and a padded ankle strap—can target every major muscle group with constant, smooth tension. By focusing on these versatile tools, you can easily replicate compound movements and isolation exercises for the upper and lower body without cluttering your training space or overspending on redundant gear.
The beauty of cable training lies in its ability to provide continuous resistance throughout an exercise’s entire range of motion, a benefit that free weights cannot always replicate. However, the effectiveness of your cable workouts depends heavily on using the right handle for the job. Selecting high-quality attachments that match your physical dimensions, strength levels, and training environment ensures that your workouts remain safe, comfortable, and highly productive over the long term.
Key Selection Criteria Before You Buy
Before purchasing any cable attachments, your first step is to verify compatibility with your existing cable machine. While many home and commercial gyms utilize a standard carabiner connection, some compact, wall-mounted, or functional trainer systems feature proprietary ball-end cables or unique ring setups. Check your machine’s user manual or measure the thickness of the existing carabiner and cable eyelet. Ensuring that the attachment’s connection ring fits securely into your machine’s clips prevents dangerous slippage or unexpected disconnects during heavy sets.
Products mentioned in this guide
Prices are valid at publication and may change. Please refer to the product page for the latest price.
Handle materials require careful consideration, especially if you train in a warm, humid environment like the Philippines. High humidity and intense workouts lead to sweaty hands, making grip security a primary safety concern. Knurled steel handles offer an exceptionally secure, non-slip grip for heavy pulling and pushing, but they require regular wiping down to prevent surface rust. Rubber-coated handles provide a comfortable, slip-resistant alternative that is highly durable and easy to sanitize. Foam grips, while soft and comfortable for beginners, tend to absorb sweat, moisture, and oils, which can lead to rapid material degradation, tearing, and unpleasant odors over time.
Finally, always verify the weight capacity and structural integrity of any attachment before putting it under load. Inspect the welding quality at the connection points; smooth, consistent welds indicate a much stronger bond than patchy, uneven joints. If you are performing heavy compound movements like lat pulldowns or cable rows, ensure the attachment is rated by the manufacturer to handle your projected lifting weights. Choosing solid steel construction over hollow, thin-walled tubing provides peace of mind and prevents the metal from bending or warping under high tension.
Must-Have Attachments for Pulling Movements
Developing a strong, balanced back requires pulling from multiple angles, and three specific attachments are essential for covering these movement patterns. The first is a standard lat pulldown bar, typically measuring between 34 to 48 inches in length. This bar is the foundation for vertical pulling movements, allowing you to perform wide-grip lat pulldowns that target the outer latissimus dorsi and teres major. A quality lat pulldown bar should feature angled ends to reduce wrist strain at the bottom of the movement, helping you maintain optimal form as you fatigue.

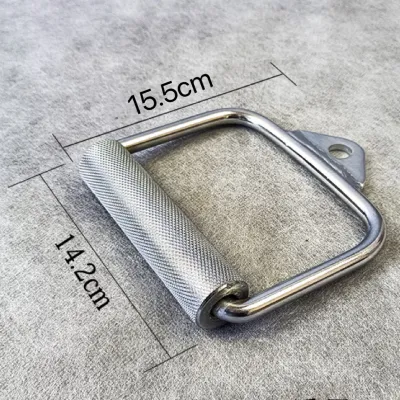
For horizontal pulling, a close-grip V-bar (or double D-handle) is indispensable. This attachment positions your hands in a neutral grip (palms facing each other), which shifts the mechanical advantage to target the mid-back, including the rhomboids, middle trapezius, and lower lats. The close-grip position also increases the range of motion at the peak contraction of a seated row and places a helpful emphasis on the biceps. When selecting a V-bar, look for a model with a textured grip surface to prevent your hands from sliding forward during heavy rows.
The third essential pulling tool is the heavy-duty tricep rope, usually made of thick, braided nylon with durable rubber ends. While primarily known for arm training, the rope is one of the most versatile tools for targeting the posterior chain and shoulders. It is the absolute best attachment for performing face pulls, an exercise crucial for rear deltoid development, rotator cuff health, and upper back posture. The flexible nature of the rope allows you to pull past your face, separating your hands at the end of the movement to achieve a deeper muscle contraction than a rigid metal bar would allow.
Must-Have Attachments for Pushing and Lower Body
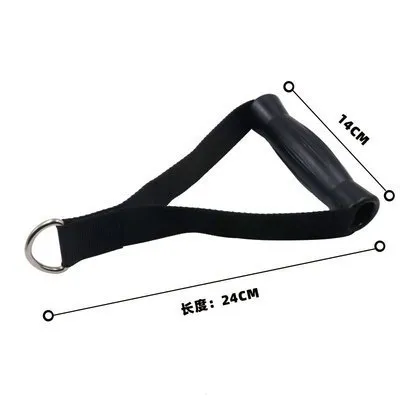
To balance your pulling routine, you need attachments capable of handling pressing movements and lower-body isolation. A pair of single D-handles is highly recommended for unilateral (one-sided) training and chest work. Using two independent D-handles allows you to perform cable chest presses, cable crossovers, and shoulder lateral raises with a natural path of motion that conforms to your individual joint structure. Look for D-handles with heavy-duty nylon webbing, smooth rotating handles, and sturdy steel D-rings to ensure they can withstand repetitive rotational forces.
For direct arm work and light pressing, a short straight bar (often around 18 to 20 inches) is incredibly useful. This attachment is perfect for tricep pushdowns, bicep curls, and upright rows. Many high-quality short bars feature a revolving hanger in the center, which allows the bar to rotate smoothly as your wrist angle changes throughout the exercise. This rotation minimizes joint stress on your wrists and elbows, allowing you to focus entirely on isolating the target muscle group.
Lower-body training on a cable machine requires a secure connection to your legs, which is where a padded ankle strap becomes essential. Ankle straps enable you to perform glute kickbacks, standing hamstring curls, hip abductions, and adductions. Because these movements place direct tension on the ankle joint, prioritize straps with thick neoprene padding and a secure hook-and-loop closure system. Double D-ring attachments on the strap provide an extra layer of safety by distributing the pulling force evenly across the closure.
If your cable machine is your primary source of resistance and lacks a built-in leg press or squat platform, consider adding a padded belt or harness to your setup. A heavy-duty dip belt or specialized squat belt can be attached to a low cable pulley to perform cable belt squats. This exercise allows you to load your legs and glutes heavily without placing axial loading on your spine, making it an excellent option for lifters recovering from lower back issues or those looking to add high-volume leg training safely.
Attachments You Can Skip for Now
When building your home gym, it is easy to get carried away by specialized accessories that promise revolutionary results. However, many of these items offer only marginal benefits over the classics. For instance, multi-grip or Swiss cable bars, which feature multiple handle angles on a single frame, are bulky, expensive, and difficult to store. Unless you are recovering from a specific shoulder injury that strictly limits your hand positioning, standard D-handles can easily replicate almost any grip angle at a fraction of the cost and space.
You should also avoid purchasing duplicate handles that offer nearly identical training angles. For example, buying three different sizes of V-bars or multiple straight bars of slightly varying lengths is an unnecessary expense. A single, medium-sized V-bar and one standard short straight bar are more than sufficient for a complete routine. Your budget is far better spent on upgrading the quality of your primary attachments rather than accumulating a large collection of redundant metal handles.
Lastly, specialized core harnesses or abdominal crunch straps can generally be left off your initial shopping list. While these padded harnesses are designed to sit over your shoulders for cable crunches, you can achieve the exact same training effect by holding a standard tricep rope on either side of your neck. By utilizing your existing attachments creatively, you keep your workout space organized and ensure that every piece of equipment you own serves multiple purposes.
How to Build Your Starter Kit on a Budget
If you are starting from scratch, the most cost-effective way to acquire your gear is to look for pre-packaged attachment bundles. Many fitness equipment manufacturers offer 3-piece or 4-piece starter kits that typically include a lat pulldown bar, a tricep rope, and a close-grip V-bar. Purchasing these items as a bundle is almost always significantly cheaper than buying each piece individually, saving you money that can be reinvested into other areas of your fitness setup.
Once you have secured a basic bundle, you can fill in any remaining gaps by purchasing single items like D-handles and a padded ankle strap individually. When shopping, compare the total cost of these items in Philippine Pesos (₱) across local fitness specialty stores and reputable online marketplaces. Keep in mind that heavy steel attachments, such as lat bars and V-bars, can incur high shipping fees due to their weight. Checking for local pickup options or regional distributors can often lead to substantial savings on delivery costs.
Before finalizing your purchase, establish a clear priority list based on your personal fitness goals. If your primary focus is upper-body development, prioritize the lat bar, V-bar, and D-handles first. If you plan to use the cable machine extensively for glute and leg sculpting, ensure the padded ankle strap is at the top of your list. By matching your purchases directly to your immediate training needs, you can build a highly functional, professional-grade cable setup without overspending.
Frequently Asked Questions (FAQ)
Are cable machine attachments universal across all brands?
Most modern home and commercial cable machines utilize standard carabiner clips that are compatible with any attachment featuring a standard-sized connection eyelet. However, some specialized, compact, or wall-mounted functional trainers use proprietary cable ends, such as ball-stop systems or smaller custom rings. To avoid purchasing incompatible accessories, always measure the diameter of your machine’s cable end or consult the manufacturer’s manual before ordering new attachments.
How do I clean and maintain rubber or foam grips?
To clean rubber or foam grips, wipe them down thoroughly after each workout using a soft cloth dampened with a mild solution of dish soap and warm water. Avoid using harsh chemical solvents, bleach, or high-concentration alcohol sprays, as these substances can dry out and crack rubber or cause foam to crumble. Because the tropical climate in the Philippines brings high humidity, it is crucial to let your grips air dry completely in a well-ventilated area before storing them in closed gym bags or cabinets to prevent the growth of mold, mildew, and unpleasant odors.
Community discussion
Share your experience or ask a question. Comments are reviewed before publication.