
Building strong, defined legs does not require a gym membership or bulky, expensive machines. By combining a jump rope and resistance bands, you can create a highly effective home workout that targets every major muscle group in your lower body. The jump rope provides high-velocity cardiovascular conditioning and explosive calf engagement, while resistance bands supply continuous tension to challenge your quadriceps, hamstrings, and glutes. This combination allows you to stimulate muscle growth, improve endurance, and build functional lower-body strength right in your living room.
Using these two portable tools is also highly cost-effective. High-quality leg exercise equipment, such as a durable speed rope and a set of multi-resistance loop bands, can easily be found for under ₱500. This minimal investment offers a versatile alternative to heavy gym equipment, making it easier to maintain a consistent fitness routine at home.
Setting Up Your Space and Checking Your Gear for Safety
Before starting your workout, you must prepare your environment and inspect your leg exercise equipment to prevent injuries. Clear a flat, level floor space of at least two by three meters, ensuring there are no low-hanging light fixtures, ceiling fans, or nearby furniture that could catch your jump rope or disrupt your movement. If you are exercising indoors on tile or smooth concrete—which are common in tropical homes—ensure the surface is completely dry, as humidity can make these floors incredibly slippery.
Products mentioned in this guide

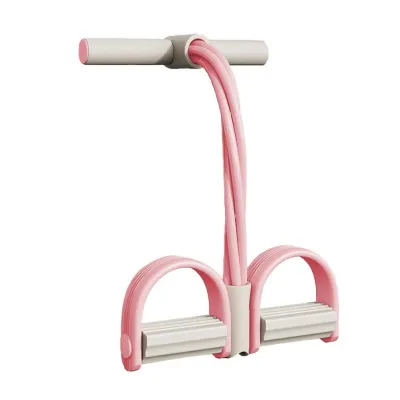

Prices are valid at publication and may change. Please refer to the product page for the latest price.
To check if your jump rope is the correct length for your height, stand on the center of the cord with one foot and pull the handles upward. The tips of the handles should reach your armpits. If the rope is too long, it will drag excessively on the floor, causing you to trip; if it is too short, you will be forced to jump too high, increasing joint impact.
Next, perform a thorough visual inspection of your resistance bands. Stretch each band slightly to check for micro-tears, discoloration, or small punctures, especially near the handles or anchor points. A compromised band can snap under tension, risking painful snaps against your skin or eyes.
When selecting your bands, choose a resistance level that allows you to complete your exercises with controlled, steady movement. Starting with a medium or light band is always safer than forcing your joints to stabilize a band that is too stiff. Finally, wear supportive athletic shoes with adequate cushioning to absorb the impact of jumping, rather than exercising barefoot on hard home floors.
Warming Up to Prepare Your Joints and Muscles
A proper warm-up is essential to prepare your joints for the high-impact nature of jumping rope and the deep resistance of band exercises. Begin with dynamic movements that actively mobilize your lower body. Spend a few minutes performing gentle ankle circles, knee hugs, and bodyweight hip hinges to lubricate your joints and increase blood flow to your muscles.

Once your joints feel loose, transition to a very light, low-impact jump rope pace. Keep your feet close to the floor and jump just high enough for the rope to pass underneath you. This gradual elevation of your heart rate prepares your cardiovascular system for the upcoming work.
During this warm-up, perform a quick mental check of how your knees, ankles, and lower back feel. If you experience any sharp, sudden pain or unusual joint clicking, stop the movement immediately to assess the issue rather than pushing through discomfort.
Jump Rope Techniques for Calf Development and Conditioning
The jump rope is an exceptional tool for building explosive power, endurance, and definition in your calves. To maximize calf engagement while protecting your joints, focus on the basic bounce technique. Keep your feet close together, land softly on the balls of your feet, and maintain a slight bend in your knees to absorb the impact. Avoid letting your heels touch the floor, which keeps constant tension on the gastrocnemius and soleus muscles.
Ankle alignment is critical when jumping rope. Keep your ankles, knees, and hips stacked vertically to distribute the impact forces evenly. If your ankles collapse inward, you place excessive strain on your plantar fascia and Achilles tendons. If you are new to jumping, start on a slightly forgiving surface like a thin rubber exercise mat rather than bare concrete to reduce the shock transmitted to your shins.
Once you master the basic bounce, you can progress to more challenging variations. Try alternating foot steps, which mimic a light jogging motion and shift your body weight from side to side, increasing the stabilization demands on each ankle. For intermediate training, you can introduce double-unders—where the rope passes under your feet twice per jump—to demand rapid, explosive calf contractions.
To structure your jump rope intervals, beginners should aim for 30 seconds of continuous jumping followed by 30 seconds of rest, repeating this cycle for five to ten minutes. Intermediate users can extend the work period to 60 seconds with shorter rest intervals. Throughout your session, watch out for common form errors. Avoid jumping too high, which creates unnecessary joint stress, and keep your elbows tucked close to your ribs, rotating the rope using only your wrists rather than swinging your entire arms.
Resistance Band Movements to Target Quads, Hamstrings, and Glutes
While the jump rope conditions your lower legs, resistance bands allow you to isolate and overload the larger muscle groups of your upper legs. Unlike free weights, which rely on gravity and provide a constant load, resistance bands offer variable resistance. This means the exercise becomes harder as you reach the peak of the movement, such as the top of a squat or a glute bridge. This unique resistance profile matches your body’s natural strength curve, providing maximum tension where your muscles are mechanically strongest.
To target your quadriceps and glutes, start with banded squats. Place a loop band just above your knees, stand with your feet shoulder-width apart, and push your knees outward against the band’s tension as you lower your hips. This outward pressure activates the gluteus medius throughout the movement. You can follow this with lateral band walks, keeping your knees slightly bent and taking controlled steps to the side to build lateral hip stability.
To isolate your hamstrings and posterior chain, perform banded Romanian deadlifts. Stand on the middle of a heavy resistance band, hold the ends or handles in your hands, and hinge at your hips while keeping your back flat. Push your hips backward until you feel a stretch in your hamstrings, then squeeze your glutes to stand upright. You can also perform glute bridges by placing a loop band around your thighs, lying on your back with your knees bent, and driving your hips toward the ceiling while pressing your knees outward.
To maintain continuous muscle engagement, ensure the band remains under slight tension even at the starting position of each exercise. You can adjust this tension by shortening your grip on the band or stepping wider to stretch it further. Always prioritize your posture: keep your chest lifted, your core engaged, and your spine neutral to protect your lower back and knees from strain.
Combining Tools into a Structured Home Leg Routine
To get the most out of your leg exercise equipment, you should organize these movements into a structured, balanced routine. A circuit-style workout is highly effective for home training, as it keeps your heart rate elevated while alternating between cardiovascular conditioning and strength movements. For example, you can perform a jump rope interval, immediately transition to a banded squat, move to a banded deadlift, and finish with lateral walks before taking a structured rest.
A balanced home circuit might look like this:
- Jump Rope Basic Bounce: 60 seconds of continuous jumping.
- Banded Squats: 15 controlled repetitions.
- Banded Romanian Deadlifts: 12 slow repetitions.
- Lateral Band Walks: 10 steps in each direction.
- Rest: 60 to 90 seconds. Repeat this entire circuit for 3 to 4 total rounds.
Adjust your work-to-rest ratios based on your current fitness level and recovery capacity. If you feel excessively fatigued or lose your form, increase your rest periods.
Keep a simple workout log to track your progress. Note down the color or resistance level of the band you used, the number of clean repetitions you completed, and how many rounds you managed before fatigue set in. This data-driven approach ensures you are actively challenging your muscles to adapt and grow over time. If you are short on space or time, you can shorten the routine to two high-intensity rounds or focus purely on a single superset of jump rope and squats.
Cooling Down and Monitoring Post-Workout Recovery
After completing your routine, a proper cool-down helps transition your body back to a resting state. Spend five minutes performing static stretches, holding each position for 20 to 30 seconds without bouncing. Focus on stretching your calves by pressing your heel toward the floor against a wall, stretching your quadriceps by pulling your heel toward your glutes while standing, and stretching your hamstrings with a gentle seated forward fold.
In warm, humid climates, recovery requires extra attention to hydration. Drink plenty of water to replace fluids lost through sweat, and consume a balanced meal containing protein and carbohydrates to support muscle repair.
As you recover over the next 24 to 48 hours, monitor how your body feels. It is normal to experience delayed onset muscle soreness (DOMS), which feels like a dull, generalized ache in the muscle bellies. However, if you experience sharp, localized pain in your knees, ankles, or lower back, or if you notice swelling around your joints, this indicates a need for rest. If joint or tendon pain persists, consult a qualified healthcare professional before resuming your training.
Frequently Asked Questions (FAQ)
Can I build significant leg muscle using only resistance bands and a jump rope?
Yes, you can build noticeable muscle tone, endurance, and strength using this equipment, though the results differ from heavy weightlifting. Resistance bands provide linear variable resistance, meaning the tension increases as the band stretches, which is excellent for keeping muscles under tension. While you may not build the extreme bulk associated with heavy barbell squats, you can achieve significant definition and functional strength by consistently applying progressive overload, such as using thicker bands and increasing your training volume.
How often should I perform this home leg workout?
For most individuals, performing this workout two to three times per week is ideal. This frequency allows you to stimulate muscle growth and cardiovascular adaptation while leaving 48 hours of rest between sessions for your muscles to repair. Watch out for signs of overtraining, such as persistent joint pain, chronic fatigue, or a decline in your jumping performance, which indicate that you need to reduce your weekly volume or take an extra rest day.
Community discussion
Share your experience or ask a question. Comments are reviewed before publication.