
Selecting the correct fly sheet for your tent is the difference between a dry, comfortable night in the great outdoors and a damp, frustrating ordeal. In tropical climates where sudden downpours and high humidity are common, a fly sheet must do more than just block rain; it must fit your tent’s specific dimensions and shape properly to allow air to circulate while keeping water out.
A mismatched fly sheet can sag, flap loudly in the wind, or leave vulnerable seams exposed to the elements. By understanding how to measure your tent, calculate the necessary coverage, and secure the fabric properly, you can ensure your shelter remains a reliable sanctuary during your camping trips.
Measure Your Tent and Identify Its Shape
Before searching for a fly sheet for tent setups, you must establish the exact physical dimensions of your current shelter. Pitch your tent fully in a flat area, ensuring all poles are completely extended and the body is taut. Using a standard measuring tape, record the maximum length and width of the tent’s footprint at its widest base points.
Products mentioned in this guide
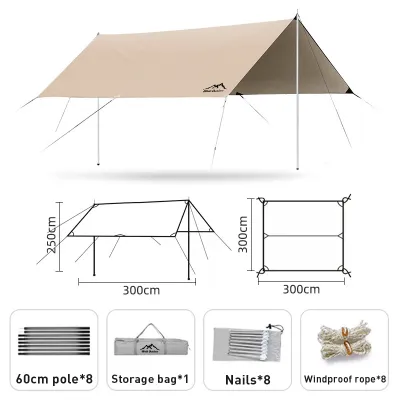

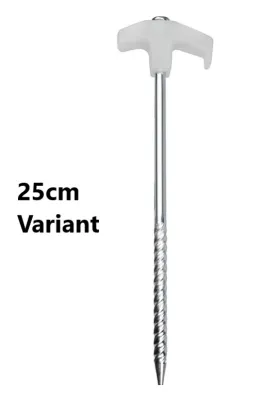
Prices are valid at publication and may change. Please refer to the product page for the latest price.
Next, measure the peak height by running the tape vertically from the ground to the absolute highest point of the tent frame. These three numbers form the baseline dimensions that any potential fly sheet must accommodate.
Beyond simple measurements, the structural profile of your tent dictates how a fly sheet will drape and perform. Identify whether your tent is a dome, tunnel, A-frame, or cabin style. Dome tents feature crossing poles that create a rounded profile, requiring a fly sheet with matching curved seams to prevent fabric bunching.
Tunnel tents have parallel arched poles that need a long, streamlined cover, while cabin tents have vertical walls that require a fly sheet with a steep drop to shed water away from the sides.
To ensure accuracy, locate the manufacturer’s original specifications. This information is typically printed on a small white tag sewn inside the tent body, on the storage stuff sack, or in the original user manual. Cross-referencing your physical measurements with these official specifications helps you avoid errors caused by uneven pitching or slightly sloped ground during your measurement process.
Calculate the Necessary Overhang and Coverage
A fly sheet must extend beyond the physical footprint of your tent to provide adequate protection. This extra distance, known as the overhang or drop, prevents rain splashback from bouncing off the ground and entering through the breathable mesh walls of your inner tent. For standard camping conditions, a minimum overhang of 10 to 15 centimeters on all sides is generally recommended to keep wind-driven moisture at bay.

Your local camping environment should guide how much coverage you calculate. In hot, humid tropical regions, you may want a fly sheet that stops slightly short of the ground to maximize airflow and prevent condensation from building up inside the tent.
However, if you frequently camp in areas prone to heavy, driving rain, a full-coverage fly sheet that extends almost to the ground is necessary to seal out moisture. For high-wind environments, such as exposed mountain ridges, a lower-profile fly sheet with minimal overhang reduces wind drag and prevents the fabric from acting like a sail.
Avoid the temptation to buy an oversized fly sheet simply to get extra protection. Excessively large sheets are difficult to tension properly, leading to sagging areas where rainwater can pool and eventually seep through. Furthermore, loose, flapping fabric is highly susceptible to tearing in strong gusts and creates a loud, disruptive noise that can ruin your sleep. Calculate your needs precisely to find a balance between ventilation and coverage.
Match the Fly Sheet Shape and Attachment Points
When selecting a fly sheet for tent protection, you must choose between a universal tarp and a model-specific, custom-molded fly. Universal rectangular or square tarps offer excellent versatility and can be pitched in various configurations using trekking poles or trees. However, they require advanced rigging skills and rarely provide the aerodynamic, snug fit of a custom fly sheet.
Custom-molded fly sheets are tailored to the exact contours of specific tent models, offering enhanced wind resistance and a reliable seal against the elements.
Physical compatibility depends entirely on the attachment mechanisms. Inspect your tent’s frame and corners to identify how a fly sheet should connect. Common systems include plastic side-release buckles, metal grommets that slip over pole tips, hook-and-loop fasteners that wrap around the poles, and elastic loops designed for ground stakes. Verify that the fly sheet you choose features matching attachment points that align correctly with your tent’s structural nodes.
The alignment of the ridge line is critical for maintaining structural integrity. The central seam of the fly sheet must sit directly over the main support poles of the tent. If the ridge line is misaligned, the tension of the fly sheet will pull unevenly on the tent frame, potentially bending poles or causing the fabric to rub against the inner tent. This friction can wear down waterproof coatings and allow water to transfer directly through the mesh.
Evaluate Materials and Weight for Your Camping Style
The material of your fly sheet directly influences its durability, weight, and performance in wet weather. When browsing options, check the manufacturer’s label for waterproof ratings, which are typically measured in millimeters of hydrostatic head. A higher rating indicates greater water resistance, but you must also confirm that the seams are factory-taped or sealed. Unsealed seams will allow water to drip through the stitching during a prolonged downpour, regardless of how waterproof the fabric itself is.
Your primary camping style determines the ideal balance between weight and durability. If you are backpacking or hiking long distances, every gram matters. Look for lightweight, highly packable materials such as silicone-coated nylon (silnylon) or thin polyester, which fold down easily into a compact stuff sack.
For car camping or basecamp setups where weight is less of a concern, heavier, abrasion-resistant fabrics like thick polyurethane-coated polyester offer excellent longevity and can withstand rough handling and UV exposure over many years.
Before making a final decision, assess the packed size and total weight of the fly sheet to ensure it fits comfortably within your carrying system. A bulky fly sheet might require you to strap it to the outside of your backpack, exposing it to snags from branches along the trail. Ensure the packed dimensions align with your gear storage limits and do not compromise your comfort during transport.
Steps to Pitch, Tension, and Verify the Fit
Pitching your fly sheet correctly is just as important as choosing the right size. Begin by draping the fly sheet over your pitched tent, taking care to align the central ridge line with the tent’s peak. Look for designated orientation markers, such as color-coded webbing or matching buckles, to ensure the doors of the fly sheet align directly with the entryways of your inner tent.
Once the fly is draped, secure the primary anchor points first. Fasten the corners to the tent poles or stakes, working in a diagonal pattern to distribute the tension evenly. Next, systematically attach any interior hook-and-loop tabs to the tent poles to keep the fly centered.
Extend the guylines outward at a 45-degree angle from the tent corners and secure them with stakes. Use the tensioners on the guylines to pull the fabric taut, eliminating any wrinkles or sagging sections where water could collect.
Perform a final visual and physical inspection of your setup. Walk around the tent and verify that there is a clear gap of at least 5 to 10 centimeters between the fly sheet and the inner tent body. This space is crucial for ventilation, allowing warm, moist air to escape and preventing condensation.
Ensure that no part of the fly sheet is touching the ground, as this can draw moisture upward into the fabric. If you notice any sagging, adjust the guyline tension until the entire structure is rigid and secure.
Frequently Asked Questions (FAQ)
Can I use a standard rectangular tarp instead of a custom fly sheet?
Yes, you can use a standard rectangular tarp, but it requires a higher level of outdoor skill. While a generic tarp can provide reliable overhead shelter, you must use trekking poles, trees, and advanced knot-tying techniques to rig it securely over your tent. Generic tarps lack the custom attachment points and tailored contours of a dedicated fly sheet, which often results in poor aerodynamics, increased flapping noise in high winds, and potential gaps where rain can enter.
How do I prevent water from pooling on the fly sheet during heavy rain?
To prevent water from pooling, you must maintain high tension across the entire surface of the fly sheet. Periodically check and tighten your guylines, as wet fabric can stretch and sag over time. Ensure the underlying tent poles are fully extended and locked in place, as a weak or sagging frame will cause the fly sheet to dip. If necessary, adjust the angle of your guylines to create a steeper slope, encouraging rainwater to run off quickly rather than collecting in flat areas.
Community discussion
Share your experience or ask a question. Comments are reviewed before publication.