
Selecting the right holster is one of the most critical decisions a shooter makes when entering competitive shooting sports or upgrading their range gear. A high-quality holster does not simply hold your firearm; it serves as a safety-critical interface between your body, your belt, and your handgun. In shooting disciplines where split seconds determine your placement on the leaderboard, your holster must deliver a smooth, predictable draw while ensuring the firearm remains absolutely secure during rapid physical movement. Making the wrong choice can lead to poor performance, match disqualification, or serious safety hazards on the firing line.
To find the ideal configuration, you must evaluate your gear through a systematic framework that balances the strict rules of your chosen shooting sport, the exact physical dimensions of your handgun, and your preferred mounting hardware. Whether you are navigating the fast-paced courses of the International Practical Shooting Confederation (IPSC), the defensive scenarios of the International Defensive Pistol Association (IDPA), or practicing your skills at a local outdoor range, your holster must align with specific technical requirements. By understanding these variables, you can select a setup that enhances your shooting flow, keeps you compliant with safety regulations, and stands up to the demanding conditions of active range use.
Understand Shooting Discipline Rules and Demands
Every competitive shooting sport operates under a strict rulebook designed to ensure safety, fairness, and a level playing field. Before purchasing any holster, you must identify the specific discipline you plan to shoot, as a holster that is highly advantageous in one sport may be completely illegal in another. Navigating these rulebooks early saves you from the frustration of arriving at a match only to find your gear is disqualified during the safety inspection.
Products mentioned in this guide
![[JR Holster] Duty Holster Automatic Lock](https://img.lazcdn.com/g/p/ee9ffb11c70688e458fdcbf3ed52d782.jpg_400x400q80.jpg_.webp)
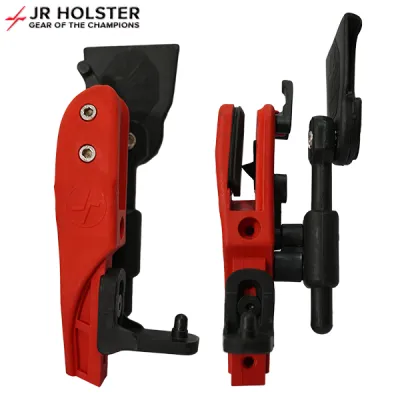
Prices are valid at publication and may change. Please refer to the product page for the latest price.
In the International Practical Shooting Confederation (IPSC), particularly within the Production, Standard, or Open divisions, the emphasis is on speed, accessibility, and absolute retention during dynamic movement. IPSC courses of fire often require shooters to sprint, bend, climb over obstacles, or shoot from low ports. Consequently, your holster must hold the firearm securely under high physical stress while allowing for an unobstructed draw. IPSC rules dictate strict limits on how far the handgun grip can sit from your body—typically measured from the inner side of the belt to the closest part of the firearm grip. Using a highly offset competition hanger that pushes the gun too far outward will result in a rule violation, forcing you to compete in a different division or adjust your gear on the spot.
Conversely, the International Defensive Pistol Association (IDPA) focuses on practical, defensive shooting scenarios where concealment is a core requirement. IDPA rules mandate that your holster must be suitable for daily concealed carry and must fully hide the firearm under a standard cover garment, such as a vest, jacket, or loose shirt. This means highly offset competition hangers, drop-leg rigs, and active retention devices that require thumb breaks are generally prohibited. Furthermore, IDPA requires the holster to be positioned behind the hip bone, aligning with the centerline of your body. The holster body must sit tight against your torso, with no visible daylight between the holster and your belt when viewed from the front, ensuring the setup remains truly concealable.
For recreational shooters and casual range users who are not bound by competitive rulebooks, the priorities shift toward long-term comfort, durability, and ease of handling. If you spend long hours at an outdoor range, especially in hot and humid tropical climates, you need a holster that resists sweat and environmental moisture without warping or degrading. A simple outside-the-waistband (OWB) holster with a sturdy belt slide or a secure paddle attachment offers excellent utility for basic training, holster draw practice, and casual plinking. Without the pressure of competitive rules, you can focus entirely on finding a comfortable ride height and a natural draw angle that suits your physical build.
Verify Firearm and Accessory Compatibility
Once you have identified the rules of your discipline, the next step is ensuring an exact physical match between your holster and your firearm. Modern molded holsters, typically constructed from rigid polymers or Kydex, rely on precise friction fits around specific contours of the handgun to provide secure retention. A holster that is even slightly incompatible can result in a loose, unsafe fit or a draw stroke that binds and snags when you least expect it.

You must verify the exact make, model, and barrel length of your handgun against the manufacturer’s specifications. For example, a holster molded specifically for a full-size service pistol will rarely provide a secure fit for a compact or subcompact variant of the same model line, as the trigger guard shapes and slide widths often differ. Additionally, pay close attention to the muzzle end of the holster. Closed-bottom holsters require an exact match to your barrel length to prevent the slide from shifting vertically. Open-bottom designs offer slightly more flexibility, allowing longer barrels, threaded muzzles, or compensators to pass through the bottom, provided the trigger guard area remains fully covered and protected.
The widespread adoption of slide-mounted red dot sights and weapon-mounted lights adds another layer of compatibility checking. If you run an optic for divisions like IPSC Production Optics or IDPA Carry Optics, your holster must feature a dedicated optic cut. This is a lowered section of the front sweat guard that allows the red dot sight to clear the holster body cleanly during the draw and reholstering. Without this cut, the optic will collide with the holster shell, preventing the firearm from seating fully or drawing safely. Similarly, if you use a weapon-mounted light, the holster must be molded specifically for that exact light model, as light-bearing holsters typically secure the firearm by gripping the body of the light rather than the trigger guard.
Safety must remain your primary concern when evaluating compatibility, which means checking for complete trigger guard coverage. When your handgun is fully seated in the holster, the trigger guard must be entirely enclosed by the holster shell. There should be no gaps large enough for a finger, loose clothing, or range debris to slip inside and make contact with the trigger. You should also inspect the clearance around the magazine release button; a well-designed holster should protect the release from accidental compression during movement, preventing your magazine from dropping unexpectedly onto the range floor.
Choose Carry Position and Mounting Hardware
How you mount your holster to your body directly impacts your draw speed, comfort, and safety during a course of fire. The optimal carry position and mounting hardware depend heavily on your physical build, your shooting discipline, and the type of belt you use. Investing in high-quality mounting hardware and a rigid belt setup (which can range from ₱1,500 to several thousand pesos) ensures that your holster remains anchored in a consistent position, allowing your muscle memory to develop a reliable, repeatable draw stroke.
For competitive shooting, strong-side hip placement—typically at the 3 o’clock position for right-handed shooters—is the standard. This position offers the shortest, most direct path to the target and complies with almost all competitive rulebooks. For defensive training or daily carry, appendix carry (AIWB, around the 1 o’clock position) or traditional kidney carry (the 4 o’clock position) are highly popular. It is vital to use a holster designed specifically for your chosen position; attempting to use an OWB competition holster for appendix carry is highly unsafe, uncomfortable, and physically impractical due to the rigid, bulky nature of competition hangers.
The mounting hardware you select determines how securely the holster attaches to your belt. Standard belt loops provide the most stable and secure connection, locking the holster directly onto a dedicated, rigid shooting belt. When selecting belt loops, look for adjustable inserts or spacers that match the exact width of your belt, which is typically 1.5 inches to 2 inches. Eliminating any vertical or horizontal play between the belt and the holster prevents the holster from riding up or shifting during a rapid draw. Paddle attachments offer the convenience of quick removal without unbuckling your belt, but they generally sacrifice stability and can shift on your waistline during intense physical movement.
For advanced competition setups, rigid mounting systems and drop hangers are highly valued. These systems use metal or heavy-duty polymer plates to lower the holster slightly and push it away from the body, within the limits allowed by your sport’s rulebook. This drop and offset can be highly beneficial for shooters with broader shoulders or specific body shapes, as it provides a cleaner, more natural draw path. Additionally, look for mounting hardware that allows you to adjust the cant (the angle of the holster) and the ride height. A neutral, vertical cant is ideal for speed draws, while a slight forward cant can help conceal the grip of the firearm when wearing a cover garment.
Adjust Retention and Verify Safety
Before you head to the firing line with live ammunition, you must execute a thorough fitting and adjustment process to ensure your holster is safe and functional. Proper retention balances two competing demands: it must hold the firearm securely enough to prevent it from falling out during physical exertion, yet release it smoothly and cleanly when you initiate your draw stroke. Achieving this balance requires careful adjustment and physical verification.
Most modern polymer and Kydex-style holsters feature adjustable retention screws located near the trigger guard or along the muzzle edge of the holster body. Tightening these screws compresses the holster shell, increasing the friction on the firearm, while loosening them reduces the resistance. You should make these adjustments in very small increments—no more than a quarter-turn at a time—using a hand screwdriver that fits the hardware perfectly to avoid stripping the screws. After each adjustment, insert your firearm to feel the change in resistance, aiming for a smooth, consistent pull that does not require you to jerk your belt upward to release the gun.
To verify that your retention is safe, you must perform a physical check using a completely unloaded firearm. Begin by removing the magazine, clearing the chamber, and physically inspecting the breech to ensure no live ammunition is present. Once you have verified the firearm is completely empty, insert it into the holster until you hear or feel it click into place. Hold the holster securely over a soft, cushioned surface, such as a bed or a carpeted floor, turn it completely upside down, and give it a gentle shake. The firearm should remain securely seated in the holster; if it slips out under its own weight or with a light shake, your retention is dangerously loose and must be tightened before range use.
Finally, practice drawing and reholstering your unloaded firearm to check for any physical obstructions or safety hazards. The mouth of the holster must remain rigid and wide open when the firearm is drawn, allowing you to return the gun to the holster smoothly using only one hand. You should be able to reholster your firearm safely without looking down at your belt, keeping your eyes focused downrange on potential targets or safety officers. If you feel any binding, resistance, or catching during reholstering, stop immediately and inspect the interior of the holster for debris, loose hardware, or structural warping that could interfere with safe operation.
Frequently Asked Questions (FAQ)
How do I clean and maintain a molded polymer or Kydex-style holster?
Maintaining a molded polymer or Kydex-style holster is straightforward but essential for preserving both your firearm’s finish and the holster’s retention. Over time, outdoor shooting ranges can introduce dust, sand, carbon buildup, and brass shavings into the interior of the holster. If left uncleaned, these abrasive particles can scratch your firearm’s slide and wear down the precise friction points that provide retention.
To clean your holster, first remove it from your belt and ensure your firearm is safely stored elsewhere. Use a soft brush or a dry microfiber cloth to sweep out any loose debris, paying close attention to the deep crevices around the trigger guard area. For stubborn dirt or sweat buildup, wipe the interior and exterior with a damp cloth using mild soap and warm water. Avoid using harsh chemical solvents, aerosol sprays, or boiling water, as extreme heat and strong chemicals can warp or degrade the polymer structure. Once clean, dry the holster thoroughly with a clean towel and inspect all mounting screws and retention hardware, tightening any loose screws to prevent them from backing out during a match.
What should I do if the draw feels too tight or too loose after initial setup?
If your draw stroke feels inconsistent, sticky, or excessively loose after your initial setup, you can resolve most issues through systematic troubleshooting. Start by checking the primary retention screws located near the trigger guard. If the draw is too tight, loosen the screws in tiny, quarter-turn increments, testing the draw after each adjustment until the firearm releases smoothly without binding. If the draw is too loose, tighten the screws incrementally until the holster passes the inverted shake test safely.
If adjusting the screws does not resolve the issue, inspect the interior of the holster for any foreign objects, dirt, or manufacturing burrs that might be catching on your firearm’s slide or frame. Ensure that your firearm’s accessories, such as aftermarket slide stops, extended magazine releases, or iron sights, are not rubbing against the inner walls of the holster. If the holster shell itself appears visibly warped, pinched, or deformed—which can happen if it is left in a hot car trunk under direct sunlight—do not attempt to force the firearm inside. In such cases, stop using the holster immediately and contact the manufacturer for professional guidance or replacement options.
Community discussion
Share your experience or ask a question. Comments are reviewed before publication.