
Hanging a heavy bag at home turns any spare room, garage, or balcony into a high-intensity training zone, but a secure installation is paramount to prevent property damage or severe injury. Achieving a safe punching bag hanging setup requires identifying your ceiling structure, selecting load-rated hardware, and executing precise drilling techniques. If your ceiling lacks the structural integrity to support dynamic forces, alternative options like wall mounts or freestanding stands must be considered. Always prioritize structural safety checks and manufacturer guidelines before suspending heavy sports equipment overhead.
Assess Your Ceiling Type and Find Structural Support
Before drilling a single hole, you must identify what lies above your ceiling plaster or paint. Residential buildings in the Philippines, especially modern condominiums and townhouses, commonly feature solid concrete slab ceilings. These concrete structures are ideal for supporting heavy training equipment because they offer a dense, solid mass that easily absorbs vibrations.
Conversely, many houses utilize suspended ceilings or drywall sheets attached to wooden or metal joists. Mounting a heavy bag directly into drywall, plasterboard, or decorative drop ceiling grids is highly dangerous. Drywall lacks the tensile strength to hold weight under motion; the dynamic force of a swinging bag will inevitably tear the screws loose, causing the bag to fall and leaving a massive hole in your ceiling.
Products mentioned in this guide
Prices are valid at publication and may change. Please refer to the product page for the latest price.
To safely hang your bag from a non-concrete ceiling, you must locate a load-bearing wooden joist. You can find these structural beams using a high-quality stud finder or a strong magnetic detector that locates the drywall screws holding the plasterboard to the wood. Alternatively, consulting your building’s structural layout or blueprint can provide exact measurements of your ceiling’s frame.
Once you find a potential mounting point, verify the surrounding clearance space. A standard heavy bag requires a clear 360-degree swing radius to prevent damage to your home and allow you to move freely. Measure the bag’s diameter, add your full arm and leg reach, and ensure there are no concrete pillars, glass windows, furniture, light fixtures, or low-hanging ceiling fans within that zone.
Choose the Right Hardware for Your Ceiling Material
Selecting the correct hardware prevents structural failures and keeps your training environment safe. The static weight of a punching bag is only a fraction of the force it exerts during a workout. When you throw powerful punches and kicks, the dynamic energy multiplies the stress on your ceiling mount, requiring hardware that can handle heavy impact.

For solid concrete ceilings, you must use heavy-duty concrete wedge anchors or sleeve anchors. These metal anchors expand inside the drilled concrete hole, creating a mechanical interlock that cannot be pulled out easily. Pair these anchors with a thick steel ceiling mount plate designed specifically for heavy bags.
For wooden joists, use heavy-duty steel lag screws or forged eye bolts. These screws must be thick enough to resist shearing forces and long enough to penetrate at least three inches into the center of the wooden joist. Avoid standard wood screws or thin drywall screws, as they will quickly bend or snap under lateral strain.
Always verify the manufacturer’s weight rating on the hardware packaging before purchase. The rated capacity of your mount and anchors must significantly exceed the static weight of your punching bag. For a standard 40-kilogram bag, choose hardware rated for at least 100 kilograms to safely accommodate the dynamic forces of your strikes.
Additionally, incorporate a heavy-duty chain swivel into your setup. A swivel allows the bag to spin freely when struck, preventing the chain from twisting. Without a swivel, the rotational force will transfer directly to your mounting screws, gradually backing them out of the ceiling. Adding a heavy bag spring between the mount and the chain is also highly recommended to absorb vertical vibrations and reduce noise transmission through your home.
Step-by-Step Installation Process
Installing a ceiling mount requires patience and precision. Gather all necessary tools before beginning, including a hammer drill, appropriate drill bits, a spirit level, a socket wrench, safety goggles, and a vacuum cleaner. Always read the manufacturer instructions for your specific mounting bracket before starting.
Step 1: Mark the spots
Hold your steel mounting plate flush against the ceiling at your identified structural support point. Use a spirit level to ensure the plate is perfectly aligned and not tilted. Mark the center of each bolt hole onto the concrete or wood using a pencil or marker, then double-check your marks against the plate to ensure they align perfectly.
Step 2: Drill pilot holes
Select a drill bit that matches the exact diameter specified by your anchor or lag screw manufacturer. For concrete ceilings, use a hammer drill equipped with a high-quality masonry bit. Drill straight up into the ceiling, keeping the drill perfectly vertical to avoid creating an oval-shaped hole. If drilling into wooden joists, use a standard wood bit to drill pilot holes slightly smaller than the lag screw threads to prevent the wood from splitting.
Step 3: Clean the holes
When drilling into concrete, a large amount of fine dust accumulates inside the hole. If left behind, this dust acts as a lubricant, preventing expansion anchors from gripping the concrete walls securely. Use a vacuum cleaner nozzle, a hand blower, or a thin wire brush to thoroughly clean out all residual dust and debris from each hole before inserting your hardware.
Step 4: Secure the mount
Align your mounting plate with the cleaned holes. If you are using concrete sleeve anchors, tap them gently through the plate and into the holes using a hammer until the bolt heads sit flush against the steel plate. Use a socket wrench to tighten the nuts or lag screws firmly. Tighten the bolts in a diagonal pattern to distribute the pressure evenly, ensuring there are no gaps between the mount and the ceiling.
Step 5: Hang the bag
Attach your heavy-duty swivel and optional spring to the ceiling mount. Lay your punching bag on the floor directly beneath the mount and connect the chains to the bag’s D-rings. With the help of a partner to prevent back strain, lift the bag and hook the main chain onto the swivel or spring. Double-check that all carabiners or S-hooks are fully closed and locked.
Stop conditions
Stop drilling immediately and reassess your installation if you encounter any of the following issues:
- The drill bit suddenly drops into an unexpected empty space, indicating a hollow ceiling block or unstable plaster.
- The drill hits metal rebar, which can damage your tools and compromise structural steel.
- The wood joist feels soft, damp, splintered, or rotted, meaning it cannot safely support the load.
Perform Safety Checks and Load Testing
Never begin a full-force workout immediately after hanging your bag. You must verify the structural integrity of your installation through a series of progressive safety checks to ensure nothing shifts or loosens under load.
First, conduct a thorough visual inspection. Ensure the mounting plate remains perfectly flush against the ceiling and that all bolts are tightened securely. Check that the chain swivel rotates smoothly without catching or binding.
Next, perform a static load test. Grasp the punching bag firmly and gradually apply your body weight by pulling downward. Do not swing or jerk the bag yet. Listen carefully for any creaking, cracking, or popping sounds coming from the ceiling, and watch for any falling plaster dust, which indicates movement.
Once the mount passes the static test, proceed to a dynamic test. Begin with light punches and kicks to initiate a gentle swing. Gradually increase your striking power over a five-minute period while monitoring the ceiling mount. If you notice any flexing in wooden joists, hairline cracks in concrete, or loosening of the hardware, stop training immediately and unhook the bag.
Continuous vibrations from heavy bag training can gradually loosen bolts over time. Establish a routine to inspect your mounting hardware every two to three weeks. Tighten any loose bolts, inspect the metal chains and carabiners for signs of wear, and lubricate the swivel joint to prevent friction damage.
Alternative Mounting Solutions for Unsuitable Ceilings
If your ceiling inspection reveals hollow blocks, weak plasterboard, or inaccessible joists, do not attempt to hang a heavy bag from it. Several reliable alternative mounting solutions can keep your home boxing workouts safe without risking structural damage.
Wall-mounted heavy bag arms
If you have a solid concrete or brick wall, a wall-mounted steel hanger is an excellent alternative. These brackets extend outward from the wall, providing enough distance for the bag to swing. You must secure them using heavy-duty masonry anchors. Ensure you have adequate lateral space so your punches and kicks do not force the bag into the wall.
Freestanding heavy bag stands
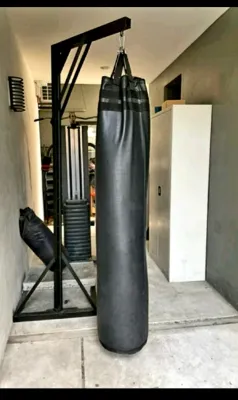
For renters or those who cannot drill into structural elements, freestanding frames are a highly practical option. These steel stands hold the bag using a built-in overhead hook. They require no drilling or permanent structural modifications, and the stand can be moved if you rearrange your workout space. However, they occupy a significant amount of floor space and can slide or tip during heavy workouts. To prevent movement, you must weigh the base down with heavy weight plates or sandbags.
Freestanding punching bags
If hanging a bag or setting up a massive steel frame is entirely impossible, consider a freestanding punching bag. These units feature a heavy plastic base filled with water or dry sand, supporting a flexible foam-filled punching column. They offer zero-installation setup, are easy to roll into a corner when not in use, and are highly suitable for apartments or homes with strict drilling rules.
Frequently Asked Questions (FAQ)
How much space do I need around a hanging punching bag?
To train safely without restricting your movement or damaging your home, calculate a clearance zone based on your reach. Measure the radius of the punching bag, then add the length of your fully extended arm or leg. As a general rule, maintain at least 1.5 to 2 meters of clear, unobstructed space in all directions from the center of the bag. This prevents the bag from colliding with walls, furniture, glass windows, light fixtures, or low ceiling fans when you strike with full force.
Can I hang a punching bag in a rented apartment?
Hanging a heavy bag in a rental property requires caution, as drilling into structural concrete slabs or wooden beams is usually considered a major alteration. Review your lease agreement carefully before starting. In many cases, landlords prohibit drilling deep holes into structural elements to protect the building’s integrity and prevent water pipe or electrical conduit damage. If drilling is not permitted, opt for damage-free alternatives like freestanding heavy bag stands or base-filled punching bags. If you do receive permission to drill, be prepared to professionally patch and seal the concrete or plaster holes when you move out to secure your security deposit.
Community discussion
Share your experience or ask a question. Comments are reviewed before publication.