
Fitting a recumbent stationary bike into a condominium unit requires balancing the machine’s physical dimensions with the functional clearance needed for safe, comfortable workouts. Unlike compact upright bikes, a recumbent bike features an elongated frame designed for ergonomic back support and a semi-reclined riding position. To integrate this equipment into your condo without disrupting your daily living space, you must plan for both its static footprint and the dynamic safety zones surrounding it. Taking the time to measure your space and understand the physical requirements of the machine prevents layout mistakes and ensures your home gym remains a functional, inviting part of your living area.
Understanding the Footprint of a Recumbent Stationary Bike
Recumbent bikes are distinct in their design, prioritizing user comfort and lower-back support through a reclined seating position. This ergonomic setup naturally requires a longer frame than traditional upright exercise bikes. While an upright bike stacks the rider vertically over the pedals to save floor space, a recumbent model extends horizontally, placing the pedals well in front of the seat. Consequently, you must prepare for a machine that occupies a more substantial linear footprint in your room.
To establish a realistic baseline, avoid relying on generic online estimates or assuming all fitness equipment shares similar dimensions. Always consult the manufacturer’s official specification sheet, product manual, or verified retailer listing for the exact length, width, and height of the specific model you intend to purchase. Standard residential models typically range from 1.3 to 1.8 meters in length and 0.6 to 0.8 meters in width, though heavy-duty or commercial-grade units may exceed these measurements.
Products mentioned in this guide
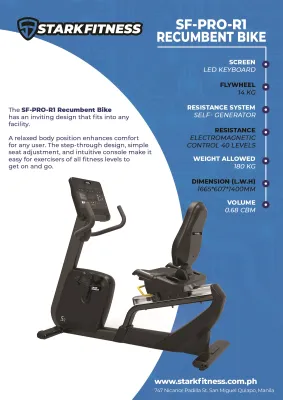
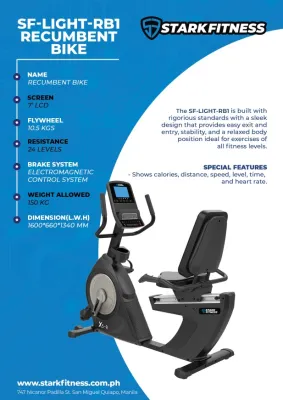

Prices are valid at publication and may change. Please refer to the product page for the latest price.
Another critical factor to consider is the adjustable seat rail. Because recumbent bikes accommodate users of varying heights, the seat must slide forward or backward along a diagonal or horizontal track. When measuring your space, do not just look at the static frame dimensions; instead, verify the maximum seat rail extension. If a taller family member needs to slide the seat to its furthest rear position, the machine’s operational length will increase, and you must ensure the seat does not strike a wall, window, or piece of furniture during use.
Calculating Clearance and Safety Zones
A successful home gym layout goes beyond the physical boundaries of the equipment itself. You must also calculate the clearance and safety zones required for mounting, dismounting, and operating the bike without restriction. Failing to plan for these buffer zones can make your workouts feel cramped and increase the risk of accidental bumps or scrapes against nearby walls and furniture.

Lateral clearance is the most critical safety zone for daily use. You should maintain at least 0.5 to 0.6 meters of open space on at least one side of the bike to allow for safe mounting and dismounting. This open area is especially important for users with limited mobility or those recovering from injuries, who require a clear, unobstructed path to sit down comfortably. Furthermore, this lateral buffer ensures that your knees and hips have plenty of room during wide pedal rotations, preventing your joints from brushing against adjacent objects.
Front and rear clearance zones are equally vital for the machine’s performance and your overall comfort. Leave a minimum of 0.3 to 0.5 meters of space at both ends of the bike. Front clearance ensures that built-in cooling fans can circulate air effectively and prevents the console screen from feeling overwhelmingly close to your face. Rear clearance provides easy access to the power switch, cord connections, and leveling feet, while also ensuring that any emergency stop mechanisms or manual adjustment knobs remain fully accessible at all times.
Do not overlook overhead clearance, particularly if your condo has dropped ceilings, decorative light fixtures, or low-hanging fans. Although recumbent bikes keep your body relatively low to the ground, you still need enough vertical space to sit upright comfortably. If your chosen model features moving upper-body handlebars designed for a dual-action workout, verify that your arms and hands can move through their full range of motion without coming close to any overhead obstacles.
Measuring Your Condo Space for the Setup
Before purchasing your equipment, you must conduct a thorough physical assessment of your condominium unit. This process involves mapping out the delivery route as well as the final installation spot. Many fitness enthusiasts purchase large equipment only to discover that the delivery box cannot clear the tight corners of their building’s entryways or hallways.
Begin by measuring the height and width of your building’s service elevator, main corridors, and your unit’s front door frame. Recumbent bikes are often shipped partially assembled in large, heavy boxes that require significant clearance to maneuver. Knowing these dimensions beforehand helps you plan whether you need to unbox the components in a common area or if the delivery team can bring the packaged unit directly into your living room.
Once inside your unit, identify a dedicated floor space that sits well away from high-traffic walkways and inward-swinging doors. Placing a large piece of exercise equipment in a major pathway creates a constant physical obstacle for household members and guests. Additionally, avoid placing the bike in areas exposed to direct, intense sunlight. Prolonged exposure to solar heat and ultraviolet rays can degrade plastic housings, fade console screens, and cause synthetic leather seats to crack prematurely.
Finally, plan your power outlet proximity and cable management routes. Most modern recumbent bikes require a continuous electrical connection to power their magnetic resistance systems and digital consoles. Position the bike close to a reliable wall outlet to avoid running long extension cords across the room. If a cable must cross a walking path, secure it with a low-profile, heavy-duty rubber cable protector to eliminate tripping hazards and protect the wire from being pinched or damaged.
Space-Saving Strategies and Layout Adjustments
Living in a condominium often means making multi-purpose use of your available square footage. If your workout area must double as a living room, home office, or guest bedroom, you can employ several practical layout strategies to keep the space from feeling cluttered or overwhelmed by fitness gear.
If floor space is at a premium, prioritize purchasing a recumbent bike equipped with built-in transport wheels or a foldable frame. Transport wheels allow you to easily tilt the machine and roll it into a corner, closet, or utility room when it is not in use. Foldable models are designed to collapse upward or inward, significantly reducing their static footprint and allowing you to reclaim valuable floor space for daily activities when your workout is complete.
Using a dedicated equipment mat is another highly effective strategy for small-space living. A high-density rubber or PVC mat visually defines your workout zone, creating a clean aesthetic boundary between your fitness equipment and your living area. Beyond aesthetics, a quality mat protects your condo’s flooring—whether it is hardwood, laminate, or ceramic tile—from sweat, scuffs, and the heavy pressure exerted by the bike’s leveling feet.
To maintain an open, airy feel in your condo, consider the visual placement of the bike within the room. Positioning the machine to face a window or an open balcony door can make your workouts feel more engaging and less confined. If you prefer to keep your exercise equipment out of sight when hosting guests, you can use open shelving units, decorative folding screens, or tall indoor plants as subtle room dividers that block the view of the bike without blocking natural light.
Frequently Asked Questions (FAQ)
Can I place a recumbent bike on a balcony or near an open window?
Placing a recumbent bike on an open balcony or directly next to an open window is generally not recommended, especially in tropical climates characterized by high humidity and sudden rain showers. Moisture and salt air can rapidly corrode metal frames, damage delicate electronic consoles, and lead to mold growth on seat cushions. Additionally, direct sunlight can overheat the machine’s internal components. Always check your manufacturer’s warranty and care guidelines, as outdoor or semi-outdoor placement typically voids coverage for residential fitness equipment.
Will the bike cause noise or vibration complaints from downstairs neighbors?
Recumbent stationary bikes are among the quietest cardio machines available, making them highly suitable for multi-story condominium living. Unlike treadmills, which generate significant impact noise from running, recumbent bikes utilize smooth magnetic or fluid resistance systems that operate almost silently. To ensure you do not disturb your downstairs neighbors, place a thick, high-density rubber equipment mat under the bike to absorb any minor motor hum or frame vibration. Additionally, regularly check and adjust the bike’s leveling feet to ensure the frame sits perfectly flat and does not rock or rattle against the floor during intense pedaling sessions.
Community discussion
Share your experience or ask a question. Comments are reviewed before publication.