
Setting up a ME Mover fitness bike inside a compact condominium requires a smart balance between the equipment’s physical footprint and the space you need to move safely. Unlike traditional stationary upright bikes, this step-fit fitness device utilizes a standing, stepping motion that mimics outdoor carving and stride-based training. To accommodate this unique movement indoors, you must plan for both static storage and dynamic operational clearance.
To safely install and use this equipment in a small condo, you generally need a dedicated floor area of at least 1.5 meters in length by 1 meter in width, supplemented by a safety clearance zone of at least 0.6 meters on all sides. Because the exercise involves standing at full height, vertical clearance is just as critical as floor space. Evaluating your specific room dimensions, ceiling height, and floor stability beforehand ensures a safe, comfortable, and effective home workout environment.
Checking the ME Mover Fitness Bike Base Footprint
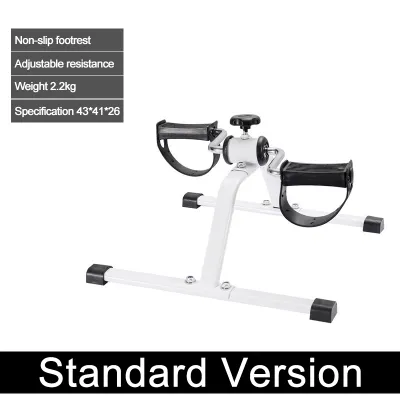
Before rearranging your living room or bedroom, you must identify the exact physical dimensions of your equipment. Because fitness equipment designs can vary by model year and specific configuration, always check the manufacturer’s official user manual or product specification sheet for the precise length, width, and height of your unit. Relying on general estimates can lead to layout errors that compromise your living space.
Products mentioned in this guide
![Xiaomi Yesoul Smart Exercise Bike S3 Spinning Bike Magnetic Bike Indoor[International Edition Adjustable FeaturesMobile APPLow Noise Belt Drive Magnetic Resistance Household Fitness Home Gym Cycling Cardio Easy Install Portable Compact Size ]](https://img.lazcdn.com/g/p/8bd2105833d0148c7c25d7ae2e298bb0.jpg_400x400q80.jpg_.webp)
Prices are valid at publication and may change. Please refer to the product page for the latest price.
It is vital to distinguish between the static base footprint and the dynamic operational footprint. The static footprint is the physical space the wheels or support stand occupy when the device is stationary. The operational footprint includes the widest points of the equipment during active use, such as the maximum lateral swing of the steering column, the outward flare of the handlebars, or the full range of motion of the stepping pedals. Measure these maximum outer limits to prevent the moving parts from scraping against walls or furniture.
Additionally, verify the total weight of the equipment, including any indoor trainer stand or stationary adapter you plan to use. In high-rise condominium developments, floors are engineered to support standard residential loads, but it is always wise to verify weight limits if you plan to set up your workout station on a balcony or a lightweight loft floor. Ensure the combined weight of the equipment, the stationary stand, and your own body weight falls safely within the structural load capacity of your building’s flooring guidelines.
Calculating Safe Clearance and Operational Space
Operating a standing fitness device requires more than just fitting the frame into a tight corner. You must establish a dedicated safety clearance zone around the entire perimeter of the equipment. Standard fitness safety guidelines recommend adding at least 0.6 meters (approximately 2 feet) of unobstructed space to the front, back, and sides of the operational footprint. This buffer zone prevents your limbs, clothing, or the machine itself from colliding with nearby objects during high-intensity workouts.

Vertical clearance is a unique and often overlooked requirement for standing fitness equipment. Because you stand upright on the pedals rather than sitting on a saddle, your head will be positioned significantly higher than it would be on a standard stationary bicycle. Measure your condo’s ceiling height carefully, taking note of low-hanging beams, decorative dropped ceilings, light fixtures, or ceiling fans. To verify your vertical clearance, calculate your standing height while wearing athletic shoes, add the maximum height of the pedal at its highest point of rotation, and ensure there is still a comfortable safety margin below the ceiling.
Finally, factor in the space required for mounting and dismounting the equipment. You need a clear, slip-free path to step onto the device and regain your balance without squeezing past walls, sharp furniture corners, or glass sliding doors. If you need to dismount quickly or lose your balance during a strenuous interval, having open space on at least one side of the bike is a critical safety requirement that cannot be ignored.
Measuring Your Condo Layout for the Equipment
To ensure your fitness setup fits seamlessly into your daily life, use a practical, step-by-step physical mapping process. Grab a tape measure and note the total required zone, which consists of the dynamic footprint plus your safety clearance buffers. Use low-tack painter’s tape or masking tape to outline this entire zone directly on your condo floor. This visual guide allows you to see exactly how much floor space will be occupied and how it affects the room’s flow.
With the tape outline in place, walk around the perimeter to check for physical obstacles. Look for baseboards that might prevent the equipment stand from sitting flush against a wall, and check the swing paths of nearby doors, wardrobe panels, or kitchen cabinets. Ensure the workout zone does not intrude into primary walkways or block emergency exit routes. If you have to squeeze past the equipment to reach the bathroom or the front door, the location is not suitable.
Environmental factors are equally important in a compact living space. In tropical climates, high humidity and heat make proper airflow essential for indoor workouts. Position your setup near an air conditioning vent, a window that receives a cross-breeze, or a spot with sufficient space for a high-velocity floor fan. If your specific setup utilizes electronic sensors, interactive training rollers, or smart trainer accessories, verify that the spot has safe access to a grounded electrical outlet. Avoid running extension cords across high-traffic walkways, as this creates a serious tripping hazard.
Space-Saving Placement Strategies for Compact Rooms
Integrating a fitness bike into a small condo does not mean you have to sacrifice your interior design or daily comfort. One effective strategy is to position the equipment in multi-purpose areas or underutilized corners. An empty alcove, a spot next to a study desk, or the space behind a sofa can serve as an excellent workout zone during active hours while remaining out of the way of your main living traffic.
If you prefer to keep your workout space visually distinct without building permanent walls, use subtle design cues to define the zone. A dedicated, high-density equipment mat, strategic accent lighting, or a lightweight, folding privacy screen can establish a clear boundary for your home gym. This helps maintain a clean aesthetic in your condo, allowing you to mentally transition from workout mode to relaxation mode when the session is over.
For the ultimate space-saving solution, plan for mobility. If your fitness bike or its indoor trainer stand features built-in transport wheels or a folding frame, keep the pathway to your storage area clear. This allows you to easily roll the equipment into a utility closet, behind a decorative curtain, or flat against a wall when guests visit. Choosing highly mobile support accessories ensures that your home gym only occupies prime floor space when you are actively exercising.
Frequently Asked Questions (FAQ)
Can I place the fitness bike on a carpet or area rug?
Yes, but you must ensure the surface remains completely stable and level. Soft, plush carpeting or loose area rugs can cause the fitness bike or its stationary stand to wobble during high-intensity stepping movements, which compromises your balance and increases wear on the equipment’s frame.
To prevent stability issues and protect your condo’s flooring, place a high-density, non-slip equipment mat directly over the carpet or hard floor. A thick, water-resistant mat dampens mechanical vibrations, reduces noise transmission to your downstairs neighbors, and catches sweat, preventing moisture damage to expensive laminate, vinyl, or hardwood floors that could cost upwards of ₱10,000 to repair.
Do I need to anchor the fitness bike to the wall?
No, most freestanding fitness bikes and indoor trainer stands are engineered with a low center of gravity and a wide, stable base that relies on gravity and weight distribution to remain secure. They do not require permanent wall anchors, making them ideal for rented condos where drilling into walls is prohibited.
Always consult your specific equipment manual to verify the correct setup, leveling, and stabilization procedures. If your condo floor is slightly uneven, utilize the adjustable leveling feet commonly found on high-quality trainer stands to eliminate any rocking motion before you begin your workout.
Community discussion
Share your experience or ask a question. Comments are reviewed before publication.