
Selecting the right gear can make or break your outdoor experience, especially when navigating the diverse microclimates of the Philippines. If you are planning a nature hike tent purchase, the ideal shelter must balance low trail weight with robust protection against intense tropical elements. Backpacking through the mossy forests of the Sierra Madre or climbing exposed ridges like Mt. Pulag requires a shelter that packs down small without sacrificing structural integrity.
To find the perfect balance, you must understand how different tent designs, fabrics, and ventilation systems perform in high humidity and sudden downpours. By matching these technical specifications to your specific hiking style and trail conditions, you can ensure a safe, dry, and comfortable night under the stars. Here is what you need to look for when choosing a lightweight tent for your next Philippine adventure.
What Makes a Nature Hike Tent Suitable for Philippine Trails?
The Philippine climate is notorious for sudden, torrential rains, especially during the southwest monsoon (Habagat) season. A tent must feature a high-quality, full-coverage rainfly that extends all the way to the ground to prevent wind-driven rain from splashing underneath the canopy. Additionally, a “bathtub-style” floor—where the waterproof floor fabric extends several inches up the sides of the tent before meeting the wall mesh—is essential. This design prevents pooling water and mud from seeping through the seams when camping on saturated soil or muddy clearings.
Products mentioned in this guide
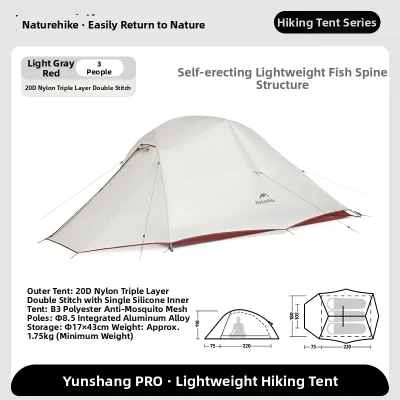
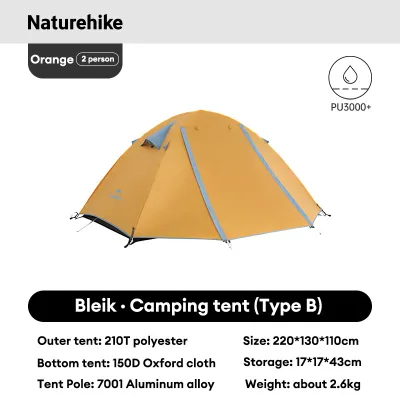
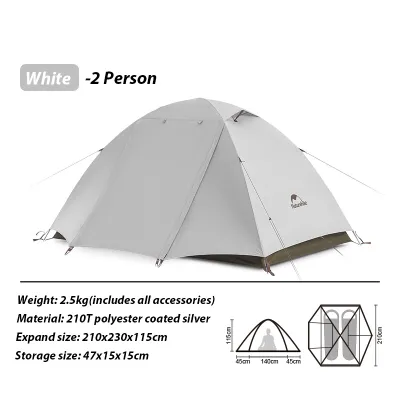
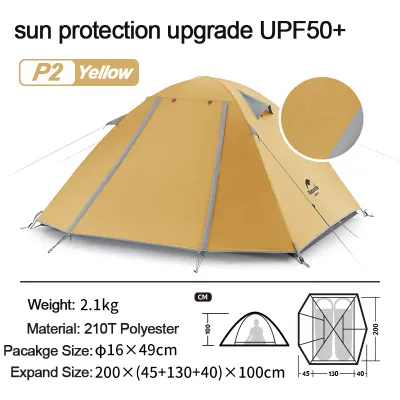
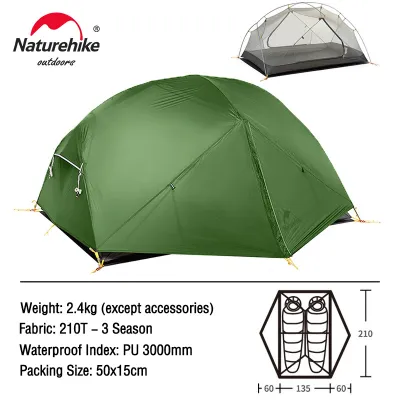
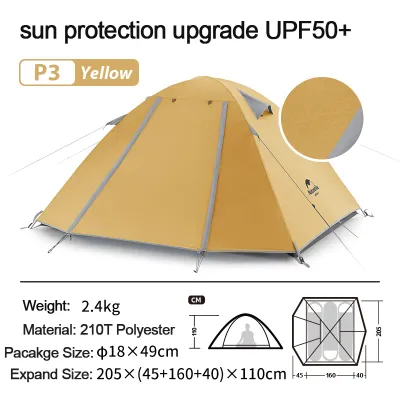
Prices are valid at publication and may change. Please refer to the product page for the latest price.
High relative humidity is a constant companion on local trails, whether you are in low-elevation jungles or high-altitude campsites. When warm, humid air inside the tent meets the cooler outside air on the rainfly, condensation forms rapidly on the interior surface. Without sufficient cross-ventilation, this moisture will drip onto your sleeping gear and clothing. To combat this, look for tents with extensive inner mesh walls and adjustable rainfly vents that promote continuous airflow, allowing warm air to escape before it condenses.
Tropical forests are teeming with biodiversity, which unfortunately includes mosquitoes, biting ants, midges, and leeches (locally known as limatik). A lightweight tent must serve as an impenetrable barrier against these pests. Ensure the inner tent uses high-density, ultra-fine “no-see-um” mesh. This mesh must be completely free of gaps, with durable, smooth-running zippers that seal tightly. Standard mosquito netting is often too coarse to stop smaller insects, making fine-mesh inner tents a vital safety feature for a comfortable night’s rest.
Campsites in the Philippines are rarely manicured lawns; you are far more likely to pitch your tent on uneven clay, exposed tree roots, sharp volcanic rocks, or gravelly ridges. While ultralight tents achieve their low weight by using extremely thin fabrics, these materials are highly vulnerable to punctures and tears on rough ground. Hikers must find a balance, choosing a tent that is light enough to carry up steep, multi-hour ascents, yet tough enough on the bottom to resist abrasion from the rugged local terrain.
Recommended Lightweight Tent Categories for Tropical Hikes
Double-Wall Freestanding Tents
Double-wall freestanding tents are the most versatile and popular choice for hikers navigating the diverse microclimates of the Philippines. These tents consist of two distinct layers: an inner canopy made primarily of breathable mesh and a separate, waterproof outer rainfly. The term “freestanding” means the tent utilizes a dedicated pole system that supports its own structure, allowing it to stand upright without requiring stakes to keep its shape.

Pros: The primary advantage of a freestanding design is its adaptability. You can pitch it easily on hard, rocky ground, concrete pads, or wooden viewing platforms where driving stakes is impossible. The physical separation between the inner mesh wall and the outer rainfly creates an insulating air gap that drastically reduces condensation transfer, keeping your sleeping area dry.
Cons: Because they require a full set of dedicated poles and two complete layers of fabric, freestanding tents are generally heavier and bulkier than their non-freestanding counterparts. They take up more volume in your backpack, which can be a drawback on long, multi-day expeditions where every gram counts.
Best For: This design is ideal for beginners, hikers who frequently camp on mixed or unpredictable terrains, and anyone who prioritizes effortless setup, superior ventilation, and reliable storm protection over absolute weight savings.
Trekking Pole (Non-Freestanding) Tents
Trekking pole tents, or non-freestanding tents, are engineered specifically for weight-conscious backpackers who already hike with trekking poles. Instead of carrying heavy, dedicated tent poles, these shelters use your adjustable trekking poles as the primary vertical supports. The structure relies entirely on tension, meaning the tent must be securely staked out to the ground to stand upright.
Pros: By eliminating dedicated tent poles, trekking pole tents offer massive weight savings and compress down to a fraction of the size of traditional tents. This significantly lightens your load during steep climbs, such as the arduous trail up Mt. Kibungan or Mt. Kanlaon.
Cons: Setting up a non-freestanding tent requires practice and a solid understanding of tension physics. Pitching becomes exceptionally challenging on loose sand, solid rock, or wooden platforms where stakes cannot easily penetrate. Furthermore, the sloping walls of these designs often result in less interior headroom and living space compared to dome-style freestanding tents.
Best For: These tents are best suited for experienced, ultralight backpackers who are comfortable with advanced pitching techniques and who primarily camp in areas with soft, stake-friendly soil.
Single-Wall Ultralight Tents
Single-wall tents combine the canopy and the waterproof rainfly into a single layer of fabric. They are designed to strip away every non-essential gram, providing a highly compact, minimalist shelter solution for fast-and-light mountain ascents.
Pros: Single-wall designs are incredibly light and quick to pitch, as there is no separate rainfly to align and secure. They occupy minimal space in your pack, leaving more room for essential supplies, food, and water.
Cons: The lack of a separate inner wall makes single-wall tents highly susceptible to condensation buildup, especially in the humid, tropical climate of the Philippines. Without a physical barrier, any moisture condensing on the inside of the waterproof fabric will easily transfer to your face, sleeping bag, or clothing if you brush against the wall.
Best For: Single-wall shelters are best reserved for highly experienced alpine-style hikers who prioritize weight above all else, and who plan to camp in well-ventilated, high-altitude ridges during dry windows where condensation can be actively managed.
Critical Specifications to Verify on Product Labels
When evaluating a nature hike tent, look closely at the Hydrostatic Head (HH) rating, which is measured in millimeters (mm). This number indicates the pressure of water the fabric can withstand before moisture penetrates. For the unpredictable and heavy rains of the Philippines, look for a rainfly with an HH rating of at least 1,500mm to 2,000mm. The tent floor requires even higher protection—ideally 3,000mm or more—because your body weight exerts pressure on the damp ground, which can force water through lower-rated fabrics. Always verify these numbers on the manufacturer’s official spec sheet rather than relying on vague retail descriptions.
Fabric thickness is measured in Denier (D). A lower denier (e.g., 15D or 20D) indicates a lighter, thinner fabric, while a higher denier (e.g., 40D to 70D) offers greater durability and resistance to tearing. Lightweight tents typically use nylon or polyester treated with polyurethane (PU) or silicone (silnylon). Silnylon is highly durable and slick, allowing rain to slide off easily, but it can stretch when wet. If you choose an ultralight 15D or 20D tent, you must handle it with extra care around sharp branches and rocky terrain to prevent accidental punctures.
The skeleton of your tent determines its stability in high winds. Aluminum poles (such as 7001 or DAC aluminum) are the industry standard for lightweight hiking tents because they offer an excellent balance of strength, flexibility, and low weight. Avoid cheap fiberglass poles, which are heavy, brittle, and prone to splintering under sudden stress. Carbon fiber poles are the lightest option available but are highly expensive and can snap cleanly if subjected to sharp, lateral impacts during a storm. For most tropical hiking scenarios, high-grade aluminum remains the safest and most reliable choice.
Even the most waterproof fabric will leak if the seams are not properly sealed. When purchasing a tent, verify whether the seams are factory-taped. Factory taping involves applying a waterproof tape under heat and pressure along all stitched lines. Some high-end silnylon tents cannot be factory-taped due to the slick silicone coating; these require manual seam sealing with a liquid silicone sealant before your first outdoor trip. Always check the product label to ensure you do not get caught in a tropical downpour with unsealed seams.
Balancing Weight, Durability, and Budget
In the outdoor gear world, there is a direct trade-off between weight, durability, and cost. To make a tent exceptionally light, manufacturers must use advanced, expensive materials like Dyneema Composite Fabric (DCF) or ultra-thin, low-denier nylon. While these materials are engineering marvels, they are inherently more fragile than heavier fabrics. On rugged Philippine trails, where campsites are often surrounded by thorny brush, sharp volcanic rock, and rough wooden platforms, an ultra-thin tent floor can easily suffer punctures if not carefully protected.
When planning your gear budget, it is helpful to look at broad price bands. Entry-level lightweight tents typically range from ₱3,000 to ₱7,000, offering decent durability but slightly higher weight. Mid-range options, often utilizing high-grade aluminum poles and 20D silnylon fabrics, sit between ₱8,000 and ₱15,000. Premium, specialized ultralight shelters can exceed ₱20,000. Instead of spending your entire budget on an ultra-expensive, fragile tent, it is often wiser to invest in a reliable mid-range tent and allocate your remaining funds to other critical gear, such as a high-quality sleeping pad or a robust backpack.
Consider how often you actually hit the trail. If you are an occasional weekend warrior who climbs two or three times a year, a slightly heavier but highly durable and budget-friendly polyester or nylon tent is the most practical choice. The extra few hundred grams will not significantly hinder short hikes, and the thicker fabric will tolerate minor handling mistakes. Conversely, if you are a frequent long-distance hiker tackling multi-day traverses or demanding peaks every month, the weight savings of a premium lightweight tent will actively reduce physical fatigue, justifying the higher financial investment and the extra care required to maintain it.
Essential Accessories to Protect Your Lightweight Tent
A custom-fit footprint or a generic groundsheet is an essential accessory for extending the life of any lightweight tent. Because modern lightweight tents use thin floor fabrics to save weight, they have very little defense against sharp rocks, twigs, and abrasive soil. A footprint acts as a sacrificial barrier, absorbing the friction and preventing punctures. It also keeps the bottom of your tent clean and dry, making packing up in the morning much easier. Ensure the footprint is slightly smaller than the tent floor so that rain running off the fly does not pool between the footprint and your tent.
Keeping your tent dry while it is packed inside your bag is just as important as keeping it dry when pitched. While many backpackers rely on external pack rain covers, these can easily snag on dense tropical vegetation or blow away in high winds, allowing water to seep into your pack during heavy downpours. A more reliable method is using an internal, waterproof pack liner or a heavy-duty dry bag inside your backpack. Placing your tent, sleeping bag, and dry clothes inside a sealed liner ensures that even if your backpack fabric becomes completely saturated, your shelter remains bone-dry.
The stakes that come standard with lightweight tents are often thin, minimalist aluminum pegs designed to save weight. However, these pegs can easily bend when driven into the hard, compacted clay or rocky soil typical of many Philippine campsites. Upgrading to heavier-duty Y-stakes or nail-style stakes provides significantly better holding power and durability. Additionally, always carry extra utility cord to extend your guy lines. Properly tensioning your guy lines to sturdy trees or heavy rocks is crucial for stabilizing your tent against the sudden, powerful wind gusts common on exposed mountain ridges.
Frequently Asked Questions (FAQ)
Do I need a 4-season tent for high-altitude peaks like Mt. Pulag or Mt. Apo?
No, a 3-season tent is generally more than sufficient for high-altitude peaks in the Philippines. While mountains like Mt. Pulag and Mt. Apo can experience near-freezing temperatures and strong winds, they do not experience heavy snow loads or alpine winter conditions that require the heavy, reinforced structures of 4-season tents. A high-quality 3-season tent with a sturdy aluminum pole structure, aerodynamic design, and excellent wind resistance will keep you safe and warm, while offering far better ventilation to handle the humidity.
How do I prevent mold on my tent in the humid Philippine climate?
To prevent mold and mildew, you must never store your tent while it is damp or wet. After returning from a humid hike, unpack your tent as soon as possible and hang it up to dry completely in a well-ventilated, shaded area. Avoid direct, intense sunlight, as prolonged UV exposure can degrade the waterproof coatings and fabrics. Once the tent is thoroughly dry, store it loosely in a breathable cotton or mesh bag in a cool, dry closet, rather than keeping it tightly compressed inside its original waterproof stuff sack.
Can I use a hammock with a rainfly instead of a tent for nature hikes?
Yes, hammock camping is a highly viable alternative for many forested trails in the Philippines, offering excellent ventilation and keeping you off wet, muddy ground. However, hammocks rely entirely on the availability of sturdy, properly spaced trees, which may not be present above the tree line (such as the grassland summit of Mt. Pulag) or in designated open-field campsites. If you choose a hammock setup, it is absolutely essential to use an integrated fine-mesh bug net to protect against tropical insects and a wide rainfly to shield against sudden downpours.

Community discussion
Share your experience or ask a question. Comments are reviewed before publication.