
Selecting a reliable four-person tent for hiking and camping in the Philippines requires balancing the demands of a tropical climate with the physical realities of mountain trails. Whether you are pitching camp on the windy, cold ridges of Mount Pulag or enduring a humid, rainy night in the Sierra Madre, your shelter is your primary line of defense. A successful group trek depends on choosing a tent that not only keeps the rain out but also manages intense humidity and packs down to a manageable weight for long, steep ascents.
To find the right balance, you must look beyond generic marketing claims and focus on verified technical specifications. A high-quality four-person tent should offer robust weather protection, excellent cross-ventilation, and a structural design that allows the packed weight to be easily distributed among your hiking group. By understanding how to evaluate materials, waterproof ratings, and interior layouts, you can select a shelter that ensures safety and comfort on any Philippine trail.
Core Selection Criteria for Tropical and Mountain Trails
Evaluating a four-person tent for the Philippine outdoors requires a clear understanding of the unique environmental challenges you will face. Tropical weather is notoriously unpredictable, often shifting from intense, direct sunlight to sudden, heavy downpours within a matter of minutes. Furthermore, the terrain can vary wildly, ranging from muddy forest floors and sandy coastal campsites to rocky, exposed mountain ridges. Your tent must be versatile enough to handle these diverse conditions without compromising on structural integrity or comfort.
Products mentioned in this guide
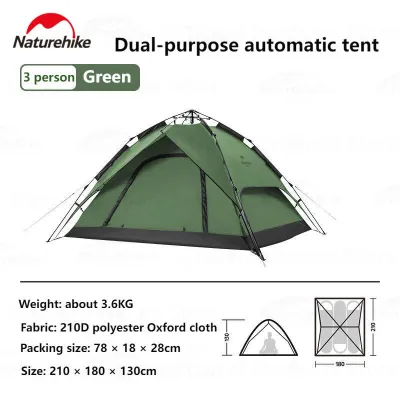
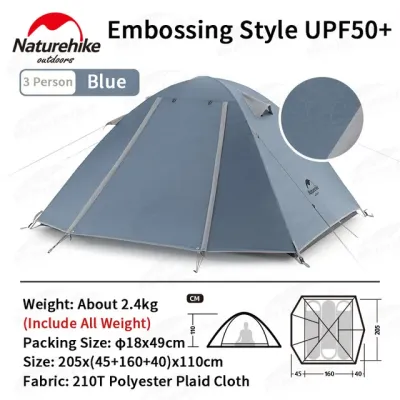
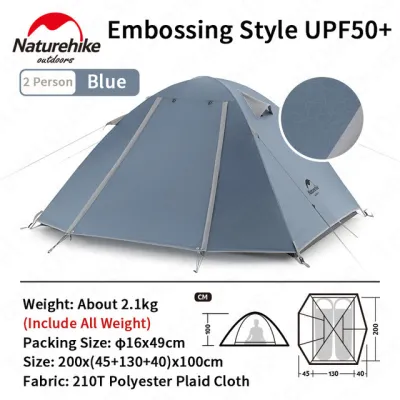
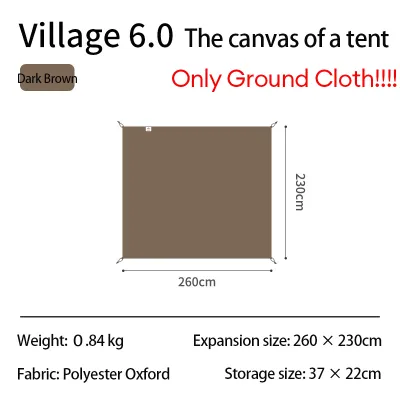
Prices are valid at publication and may change. Please refer to the product page for the latest price.
One of the most common mistakes hikers make is taking a manufacturer’s stated capacity at face value. A tent rated for four people is designed to fit four standard sleeping pads side-by-side with virtually no extra space for gear, movement, or personal comfort. In practice, a four-person tent is ideal for three adults with their backpacks, or two adults who prefer a spacious setup for extended camping trips. If you plan to sleep four adults inside the tent, you must ensure that the model features generous vestibule space to store all gear outside the main sleeping compartment.
Budgeting for a tent in the Philippines involves weighing initial cost against long-term durability on the trail. Entry-level tents priced under ₱4,000 often utilize heavy polyester fabrics and fragile fiberglass poles, which may suffice for casual beach camping but can fail under high winds or degrade quickly under intense UV exposure. Mid-range options, typically ranging from ₱6,000 to ₱12,000, generally offer a much better balance of lightweight aluminum poles, durable polyurethane coatings, and extensive mesh ventilation. High-end technical tents exceeding ₱15,000 prioritize ultralight nylon ripstop fabrics and advanced silicone coatings, which offer maximum weight savings but require careful handling to avoid punctures on rough terrain.
Managing Weight and Packability for Group Treks
A four-person tent is inherently heavier than solo or two-person shelters, with packed weights often ranging from 3.5 to over 6 kilograms. Carrying this entire load alone on steep, muddy ascents is highly impractical and increases the risk of fatigue or injury on the trail. When evaluating potential tents, it is crucial to distinguish between the minimum trail weight and the total packed weight listed on manufacturer tags. The minimum trail weight typically includes only the tent body, rainfly, and poles, while the total packed weight includes stakes, guylines, stuff sacks, and the footprint.

To make a four-person tent practical for backpacking, your hiking group should implement a load-splitting strategy. Before hitting the trail, divide the tent components among the group members to distribute the weight evenly. One hiker can carry the inner tent body, another can pack the rainfly and footprint, while a third carries the poles and stakes. This collaborative approach ensures that no single team member is overburdened, keeping the group’s overall pace consistent and reducing physical strain during long climbs.
When checking specifications, pay close attention to the pole materials, as they dictate both the tent’s packed weight and its structural strength. Avoid heavy, brittle fiberglass poles, which are prone to splintering under sudden wind gusts or cracking in cold mountain temperatures. Instead, verify that the tent utilizes high-strength aluminum alloy poles, such as 7001 or 7075 T6 aluminum. Aluminum poles offer an exceptional strength-to-weight ratio, flexing safely under high winds without snapping, and they pack down much tighter than their fiberglass counterparts.
Verifying Weather Protection and Durability
Tropical downpours in the Philippines can quickly overwhelm poorly constructed shelters, turning a comfortable camping trip into a wet, miserable experience. To verify a tent’s ability to withstand heavy rain, locate the hydrostatic head rating on the product specifications. This rating, measured in millimeters (mm), indicates the amount of water pressure the fabric can resist before leaking. For a reliable trail tent, look for a rainfly with a rating of at least 2,000mm, which is sufficient to handle heavy tropical storms. The tent floor requires an even higher rating, ideally 3,000mm or more, to prevent water from seeping through when pressure is applied by sleeping pads, knees, or elbows on wet ground.
Beyond fabric ratings, the physical construction of the tent determines its ultimate waterproof performance. Inspect the product details to ensure the tent features fully taped seams along both the rainfly and the floor, as untaped stitching is a primary entry point for water. A “bathtub floor” design is another essential feature for tropical camping; this construction style uses a continuous piece of waterproof fabric that wraps several inches up the sides of the tent before meeting the wall mesh, preventing ground water and splashing mud from seeping into the sleeping area. Additionally, check that the entry zippers are protected by wide storm flaps to prevent wind-driven rain from penetrating the zipper tracks.
Wind stability is equally critical when camping on exposed ridges or coastal areas. Evaluate the quality and placement of the guyline attachment points on the rainfly, as these are vital for anchoring the tent in high-wind conditions. The tent should include multiple, reinforced guyout points that allow you to tension the rainfly away from the inner tent body, preventing the fabrics from touching and transferring moisture. Furthermore, inspect the included stakes; standard aluminum Y-stakes or V-stakes offer superior grip in soft tropical soil and clay compared to cheap, thin steel wire stakes, which easily bend or pull out of the ground.
Assessing Ventilation and Interior Livability
In the hot, humid lowlands of the Philippines, condensation is a constant battle inside any enclosed shelter. As warm, moist air exhaled by the occupants rises and hits the cooler rainfly, it condenses into water droplets that can drip back into the tent. To combat this, prioritize tents designed with extensive mesh panels on the inner tent body. This high-mesh construction promotes continuous airflow, allowing warm air and moisture to escape rather than trapping it inside the living space.
Adjustable ventilation options on the rainfly are equally important for managing condensation during rainy weather. Look for tents that feature roof vents or kickstand vents that can be propped open even when the rainfly is fully zipped down. This design allows for cross-ventilation, drawing cool air in from the bottom of the tent and pushing warm, humid air out through the top. Without these vents, a fully sealed rainfly will quickly turn the tent interior into a humid, uncomfortable sauna, regardless of how waterproof the fabric is.
Interior livability is also heavily influenced by the design of the doors and vestibules. A quality four-person tent should feature dual doors and dual vestibules, allowing occupants to enter and exit from either side without crawling over sleeping trail mates. Vestibules—the covered gear storage areas created by the extended rainfly outside the doors—are essential for keeping wet backpacks, muddy boots, and cooking gear out of the main sleeping area. Finally, verify the interior dimensions; a peak height of at least 110 to 120 centimeters ensures that occupants can sit up comfortably, while a wide, rectangular floor plan maximizes usable sleeping space.
Building a Condition-Based Comparison Shortlist
To make an informed decision, you should build a comparison shortlist based on the specific conditions of your planned destinations rather than relying on generic recommendations. If your primary goal is low-altitude beach camping or forest trails where heat and humidity are the main challenges, prioritize maximum mesh ventilation, dual doors, and a lightweight rainfly. In these warm environments, a tent with a lower waterproof rating (around 1,500mm) but superior airflow will keep you much more comfortable than a heavy, fully sealed mountain tent.
Conversely, if you are planning high-altitude treks on exposed peaks where temperatures drop and winds are strong, your priorities must shift toward structural stability and robust weather protection. For these conditions, look for a tent with a full-coverage rainfly, a high hydrostatic head rating (3,000mm or more), multiple guyline attachment points, and a sturdy aluminum pole structure. While these tents may be slightly heavier and offer less mesh ventilation, they provide the essential protection needed to survive harsh mountain weather.
When compiling your shortlist, systematically exclude any models that fail to provide clear, verified specifications. If a manufacturer does not list the hydrostatic head rating, the pole material, or the exact packed weight, treat it as a red flag. Avoid tents with fiberglass poles for serious mountain treks, and reject designs that lack adequate ventilation options. By focusing strictly on verified label facts and matching them to your specific trail requirements, you can confidently select a four-person tent that will keep your group safe, dry, and comfortable on any Philippine adventure.
Frequently Asked Questions (FAQ)
Can a 4-person tent comfortably fit four adults with hiking backpacks?
In most cases, a standard four-person tent cannot comfortably accommodate four adults along with their large hiking backpacks. Tent manufacturers calculate capacity based on the maximum number of standard sleeping pads that can lie side-by-side on the floor, leaving no extra room for gear. To fit four adults comfortably, you must utilize the tent’s vestibules to store all backpacks, muddy boots, and extra gear outside the main sleeping compartment. If you prefer to keep your gear inside the tent for security or easy access, it is highly recommended to treat a four-person tent as a comfortable shelter for two to three hikers instead.
What are the essential drying and storage steps after a wet trail trip?
Proper maintenance after a wet trail trip is essential to prevent mold, mildew, and the degradation of waterproof coatings. As soon as you return home, pitch the tent in a dry, shaded, and well-ventilated area to let it air-dry completely; never pack a damp tent away for long-term storage. If the tent is muddy, gently wipe it down using a soft sponge and clean, lukewarm water. Avoid using harsh household detergents, washing machines, or dryers, as these can strip the polyurethane waterproof coatings and damage the delicate seam tape. Once the tent is entirely dry to the touch, store it loosely in a breathable mesh bag or a cool, dry closet rather than compressing it tightly inside its original stuff sack.

Community discussion
Share your experience or ask a question. Comments are reviewed before publication.