
To select the right inflatable air tent for camping in the Philippines, you must prioritize high waterproof ratings, robust multi-chamber air beams, and superior ventilation. The local tropical climate presents unique challenges, ranging from sudden torrential downpours during the monsoon season to intense midday heat and high humidity. Traditional poled tents can be tedious to pitch in a sudden downpour, making rapid-inflation air tents an appealing alternative. However, because these tents rely on pressurized air tubes rather than fiberglass or aluminum poles, selecting the wrong specifications can lead to structural failure or ruptured beams under the tropical sun. By evaluating specific fabric coatings, air beam construction, and airflow designs, you can secure a shelter that remains stable, dry, and cool in diverse local environments, from coastal beaches to highland campsites.
Essential Weather and Durability Specs for Local Campsites
When camping in the Philippines, your tent is your primary line of defense against highly unpredictable weather. The southwest monsoon (habagat) and sudden convective thunderstorms can dump massive amounts of water in a short period. To ensure you stay dry, the first specification to check on any inflatable tent is the hydrostatic head (HH) rating of both the rainfly and the floor. The HH rating, measured in millimeters, indicates the amount of water pressure a fabric can withstand before water starts to penetrate. For the tropical downpours common in local campsites, look for a rainfly with a minimum rating of 3,000mm on the product label. The tent floor, which experiences additional pressure from campers sitting, sleeping, or kneeling, requires a much higher rating; a heavy-duty bathtub floor with a minimum of 5,000mm HH is highly recommended to prevent ground moisture from seeping through.
Waterproof fabric alone is insufficient if the construction details are weak. Fully taped seams are non-negotiable for tropical camping. Manufacturers seal these seams by applying a hot-melt waterproof tape over the stitching, which prevents water from dripping through the needle holes. When inspecting a tent, verify that this taping covers all major structural seams, especially where the air beam sleeves meet the main tent body. Additionally, look for waterproof or highly water-resistant zippers on all doors and windows, preferably protected by wide storm flaps that shed water away from the zipper tracks. Without these protective flaps, wind-driven rain can easily force its way through the tiny gaps in the zipper teeth, pooling water inside your living space.
Products mentioned in this guide
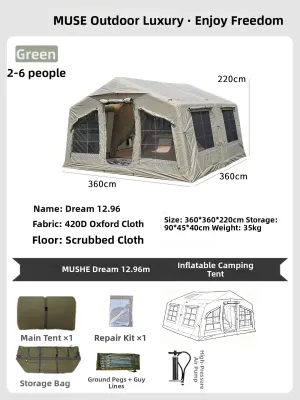
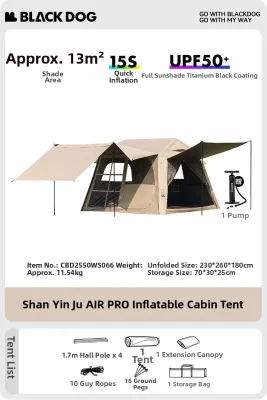
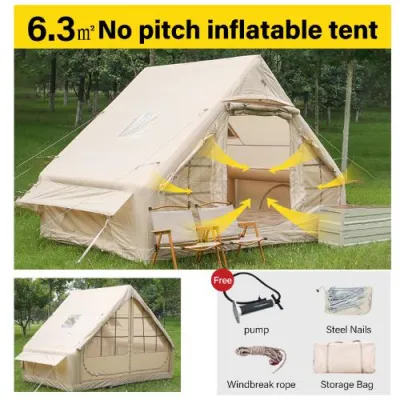
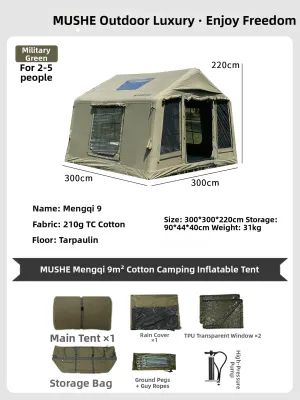
Prices are valid at publication and may change. Please refer to the product page for the latest price.
The intense tropical sun in the Philippines poses another major threat to tent longevity through ultraviolet (UV) degradation. Prolonged exposure to strong UV rays degrades synthetic fabrics like polyester and nylon, making them brittle, prone to tearing, and significantly reducing their waterproof capabilities over time. To combat this, check the product specifications for UV-resistant coatings, often labeled as UPF 50+ or treated with specialized UV inhibitors. Fabrics with a higher denier (D) rating—which measures the thickness of the individual threads—also offer naturally better resistance to UV wear and physical abrasion. A rainfly made of 75D to 150D polyester provides a reliable balance of weight, packability, and resistance to solar degradation.
Wind resistance is another critical factor, particularly when pitching your tent in exposed coastal areas or breezy highland spots. Unlike rigid metal poles that can bend permanently or snap under high winds, inflatable air beams are designed to flex and absorb wind energy, bouncing back into shape once the gust passes. However, this flexibility depends entirely on an aerodynamic profile and robust anchoring. Look for tents with a curved, dome-like, or tunnel shape that allows wind to flow smoothly over the structure rather than catching it like a sail. The sleeves holding the air beams must be securely integrated into the tent body, with multiple reinforced guyline attachment points strategically positioned along the beam lines to distribute wind loads evenly to the ground.
Air Beam Construction and Inflation Mechanics
The structural integrity of an inflatable tent relies on the design of its air beams. Single-point inflation systems allow you to inflate the entire tent from one valve, offering maximum convenience and rapid setup. However, they introduce a single point of failure; a major puncture can compromise the entire structure. For rugged outdoor use, multi-point systems with independent air chambers are safer. If one beam punctures, the remaining pressurized beams keep the tent standing, allowing you to perform repairs safely inside. Many modern tents feature isolation valves that allow single-point inflation but lock off individual chambers once pressurized, combining both benefits.

Managing air pressure is a critical operational task when camping in tropical climates. Air expands when heated and contracts when cooled. In the Philippines, daytime temperatures can easily climb from a cool 22°C at dawn to over 35°C by midday, causing a significant rise in the internal pressure of the air beams. Over-inflation can place immense stress on the seams and bladder, potentially causing a catastrophic burst. To prevent this, look for tents that feature built-in pressure relief valves, which automatically vent excess air if the pressure exceeds safe limits. If the tent does not have these automatic valves, using a pump with an integrated, easy-to-read pressure gauge is essential. Always consult the manufacturer’s manual for the recommended pressure level—typically measured in pounds per square inch (PSI) or bar—and avoid inflating the beams to their maximum limit during the cool morning hours.
The choice of pump directly impacts your setup, especially in off-grid locations. Double-action manual hand pumps are highly reliable, requiring no electrical power and delivering air on both upward and downward strokes. They are excellent for remote campsites. Electric pumps, which plug into a 12V accessory socket or run on rechargeable batteries, offer effortless setup but add weight and rely on power. Regardless of the pump type, always carry a dedicated field repair kit containing high-strength TPU repair tape, adhesive patches for inflatable bladders, and spare valve seals to address unexpected leaks.
The durability of an air beam is determined by its protective layers. The inner bladder, which holds pressurized air, is typically made of flexible TPU. Because TPU is vulnerable to punctures from sharp objects, it must be encased in a heavy-duty outer sleeve. High-quality air tents utilize double-layered or triple-layered sleeves made from heavy-duty polyester, Oxford nylon, or reinforced polyethylene. These sleeves protect the bladder from friction, puncture, and abrasion. Before purchasing, verify that the sleeve zippers are robust and covered by protective flaps to prevent dirt and sand from jamming the teeth.
Sizing, Ventilation, and Wet Gear Management
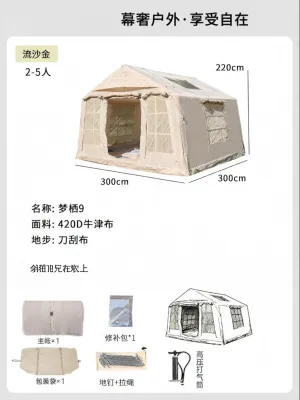
Selecting the correct tent size requires looking beyond the stated sleeping capacity. Most ratings are based on the maximum number of standard sleeping pads that can fit shoulder-to-shoulder, leaving no room for gear, movement, or air circulation. In a hot and humid climate, crowding too many people into a tight space leads to uncomfortable heat buildup and excessive condensation. As a general rule, size up by at least one or two people. For example, a family of four should look for a six-person or eight-person inflatable tent to ensure sleeping setups can be spaced apart, allowing air to flow freely.
Managing wet gear is a constant challenge when camping during the rainy season. Bringing wet clothes, muddy hiking boots, or damp backpacks directly into the main sleeping compartment raises the humidity levels inside the tent, leading to damp bedding and condensation on the walls. To prevent this, prioritize tents designed with spacious external vestibules or integrated front porches. These covered outer zones act as a transition area, allowing you to remove and store wet gear while keeping it protected from the rain. Some advanced air tents feature fully enclosed porch areas with mesh screens, providing a bug-free space to cook, dine, or relax during sudden downpours without cluttering the inner sleeping quarters.
Ventilation is the single most important factor in managing condensation and maintaining a comfortable temperature in tropical environments. High humidity levels mean that moisture from your breath can easily condense on the cooler inner walls of the tent, creating a damp interior. To maximize airflow, look for air tents that feature extensive mesh panels on the inner tent body, large adjustable roof vents, and low-level ground vents. Ground vents are particularly effective because they draw in cooler air from the ground level, pushing warm, moist air upward and out through the roof vents. Double-door designs with full mesh screens are also highly beneficial, as they allow you to open the outer solid doors for maximum cross-breeze while keeping mosquitoes, sandflies, and other insects out.
Interior organization features play a crucial role in keeping your living space tidy and dry. Look for tents equipped with elevated gear lofts, high-level storage pockets, and dedicated hanging loops for lanterns or fans. Keeping small electronics, headlamps, and dry clothing off the floor prevents them from getting damp if any moisture tracks inside. Hanging a portable, battery-operated tent fan from a central loop can dramatically improve air circulation, helping to evaporate condensation and keeping the interior cool during warm, windless tropical nights.
Recommended Tent Profiles for Philippine Conditions
To help you narrow down your choices, let us examine how different combinations of specifications suit specific camping scenarios across the Philippines.
The Monsoon-Ready Family Basecamp
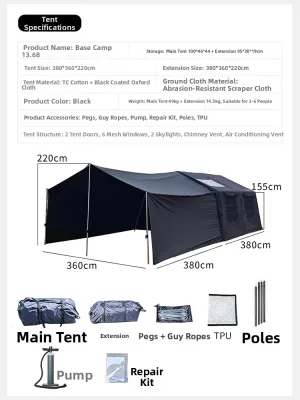
For extended family camping trips during the rainy season, your primary focus should be on maximum weather protection and spacious living areas. The ideal tent profile for this scenario features a heavy-duty polyester rainfly with a hydrostatic head rating of at least 3,000mm, paired with a thick, fully waterproof bathtub floor rated at 5,000mm or higher. Look for a multi-room layout with independent air beams to provide structural redundancy and privacy. A large, fully enclosed front vestibule is essential for storing wet gear and cooking safely out of the rain. While these tents offer exceptional comfort and weather resistance, they are heavy and have a large packed size, making them best suited for car camping sites where you can park close to your pitch.
The Wind-Resistant Coastal or Highland Tent
If your adventures take you to exposed coastal beaches or windy mountain ridges, structural stability and aerodynamic efficiency are paramount. Prioritize a low-profile tunnel or dome design that naturally sheds wind, avoiding high-profile cabin-style tents that act as wind blocks. The air beams should be constructed from thick, high-pressure TPU encased in reinforced double-layer sleeves, supported by multiple heavy-duty guyline attachment points. Look for a tent that includes strong, high-grip ground stakes suitable for sand or hard, rocky soil, depending on your destination. Proper tensioning of the guylines is critical here; the air beams must be kept taut to prevent the tent from flexing excessively in strong gusts.
The Quick-Pitch Weekend Tent
For short weekend getaways where you want to minimize setup time and beat sudden afternoon showers, a lightweight and highly portable air tent is the best choice. Look for a compact three-person or four-person design featuring a single-point inflation system that allows the entire structure to be pitched in under five minutes. The fabric should be a lightweight yet durable polyester (around 75D) with a moderate waterproof rating of 2,000mm to 3,000mm, which provides adequate protection against typical weekend showers without adding unnecessary weight. While these tents offer unmatched convenience and a compact packed size, they generally have smaller vestibules and less head space compared to heavy-duty basecamp models.
Safe Setup, Maintenance, and Operational Limits
To maximize the lifespan of your inflatable air tent and ensure your safety in the field, you must follow correct setup, maintenance, and operational procedures. Always check the applied product’s label and the treated item’s manufacturer instructions first. If instructions conflict, the item is unidentified, or the use is not covered, stop and consult the manufacturer or a qualified professional.
Before inflating your tent, clear the pitching area of sharp rocks, sticks, or debris that could puncture the floor or damage the air beam sleeves. Laying down a durable footprint or groundsheet provides an extra layer of protection against abrasion and ground moisture. Spread the tent flat and stake down the corners of the tent floor securely before connecting the pump. This ensures the tent inflates into its correct shape and prevents it from shifting or blowing away in sudden wind gusts.
Once inflated to the recommended pressure, immediately secure all guylines. Guylines provide the lateral stability that keeps air beams rigid under wind loads. Angle the stakes at 45 degrees away from the tent and tension the lines so they are taut but not over-strained. If camping on soft sand, use specialized sand stakes or bury deadman anchors to ensure the guylines remain secure.
Active temperature management is critical in tropical climates. As the sun heats the tent during the day, the air inside the beams expands, raising internal pressure. To prevent over-pressurization, check the beams during the hottest part of the afternoon with your pressure gauge. If the pressure exceeds the recommended limit, gently release a small amount of air. Conversely, as temperatures drop in the evening or during heavy rain, the air will contract, causing the tent to sag slightly. Simply add a few strokes of air with your manual pump to restore pressure.
Proper post-trip maintenance prevents mold and mildew, which thrive in humid climates. Never store your tent while damp. If you must pack up in the rain, unpack and hang the tent in a shaded, well-ventilated area until completely dry. Clean off mud, sand, or salt spray with a soft sponge and clean water, avoiding harsh detergents that strip away waterproof coatings. Once dry, store the tent loosely in a cool, dry place away from direct sunlight.
Understand the operational limits of your equipment. If you notice a significant drop in pressure not caused by temperature changes, check the valves and beams immediately. Do not continue using a tent with a severely damaged or collapsing air beam, as this compromises safety. Simple punctures can be resolved in the field using a patch kit, but large tears along seams, damaged valves, or ruptured outer sleeves require professional repair or replacement.
Frequently Asked Questions (FAQ)
Are inflatable tents safe during strong typhoons?
No, inflatable tents are not designed to withstand the extreme wind speeds and torrential rain of a strong typhoon. While their flexible air beams can absorb moderate to strong winds far better than traditional fiberglass poles, typhoon conditions exceed the structural limits of recreational camping gear. If a tropical cyclone warning or severe weather alert is issued for your camping area, you should postpone your trip, deflate your tent, and seek shelter in a permanent, solid structure. Equipment cannot replace proper safety training, situational judgment, and early evacuation planning.
How do I fix a leaking air beam in the field?
To fix a leaking air beam in the field, start by locating the source of the leak. If the leak is not immediately visible, apply a small amount of soapy water to the inflated beam and look for bubbles forming over the puncture site. Once located, deflate the beam completely and clean the area around the leak with water, ensuring it is dry and free of dirt or oils. Always consult the manufacturer’s instructions for the specific adhesive and patch application process. Apply a heavy-duty TPU adhesive patch or specialized repair tape from your tent’s repair kit directly over the puncture, pressing firmly from the center outward to eliminate air bubbles. Allow the adhesive to cure according to the manufacturer’s instructions before re-inflating the beam to a low pressure to check the seal. Always check the valve seals as well, as loose or dirty valves are a common source of slow air leaks. If instructions conflict, the item is unidentified, or the puncture is on a critical seam or valve connection, stop and consult the manufacturer or a qualified professional.

Community discussion
Share your experience or ask a question. Comments are reviewed before publication.